istio之pilot-agent 源码分析
admin
- 20 minutes read - 4190 words源码版本:istio-v1.11.3
为了方便理解,本文会介绍到 vm 和 容器 两种部署形式的情况,一般会在讲解时提到,因此需要注意当前的部署方式,不过他们的架构是完全一样的。
架构
pilot 共分两个主要模块,一个是 pilot-agent 用来提供 pod 中的服务发现 客户端,另一个是 polot-discovery 提供服务发现 服务端。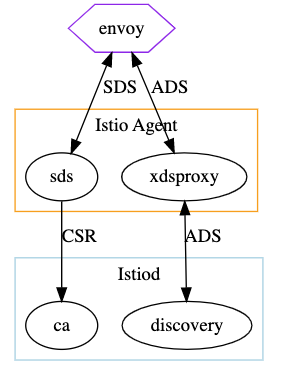
其中 envoy 和 Istio Agent 就是我们上面所讲的 pilot-agent 模块,其为 数据面 组件,而 Istiod 则为 控制面,模块对应源码见
pilot-agent
对于 polot-agent 它运行在每个pod中 ,并以 sidecar 方式与应用容器运行在同一个pod。如果你使用的是 vm 的话,则可以在当前主机通过 pstree 命令看到进程视图
# pstree -pu 24530
su(24530)───pilot-agent(24611,istio-proxy)─┬─envoy(24619)─┬─{envoy}(24620)
│ ├─{envoy}(24621)
│ ├─{envoy}(24622)
│ ├─{envoy}(24623)
│ ├─{envoy}(24624)
│ ├─{envoy}(24625)
│ ├─{envoy}(24627)
│ ├─{envoy}(24628)
│ ├─{envoy}(24629)
│ ├─{envoy}(24630)
│ └─{envoy}(24635)
├─{pilot-agent}(24612)
├─{pilot-agent}(24613)
├─{pilot-agent}(24614)
├─{pilot-agent}(24615)
├─{pilot-agent}(24616)
├─{pilot-agent}(24617)
├─{pilot-agent}(24618)
├─{pilot-agent}(24626)
└─{pilot-agent}(24698)
从进程关系可以看到,envoy 属于 pilot-agent 的一个子进程,当前进程以 istio-proxy 用户身份运行。
在 istio 中如果应用是以容器方式部署的话,则对象为 pod,如果是以 vm 部署的话,则对象为 wordloadEntry。下面我们看一下容器部署的情况。
在安装 istio 应用后,每个启用 sidecar 注入的 pod 里都会多出一来一个名叫 istio-proxy 的容器
Containers:
  nginx:
    Container ID:   docker://dea2fa5b051f74f1d5f867693543b2d9858b01b1713d70cfb1470268bb1987c9
    Image:          nginx:1.23
    Image ID:       docker-pullable://nginx@sha256:63b44e8ddb83d5dd8020327c1f40436e37a6fffd3ef2498a6204df23be6e7e94
    Port:           80/TCP
    Host Port:      0/TCP
    ...
  istio-proxy:
    Container ID:  docker://eb8eb3efee0aa35306fe248b19cfe3983ab896309e365ad4afac5bc4d5d8ae4b
    Image:         docker.io/istio/proxyv2:1.11.2
    Image ID:      docker-pullable://istio/proxyv2@sha256:0354daaaa62d064c046119035c20ea8a48b8e5824772110656a3898f9170969e
    Port:          15090/TCP
    Host Port:     0/TCP
    ...
这个容器是由 docker.io/istio/proxyv2:1.11.2 镜像提供的,其镜像是通过 /pilot/docker/Dockerfile.proxyv2 文件生成的,容器里运行的是一个叫 pilot-agent 进程。而这个进程里又以子进程的形式启动了一个 envoy 代理程序。
这样在一个 Pod 里,通过 sidecar 的方式将 envoy与原来我们的应用程序 nginx 放在同一个网络命名空间,通过这种方式可以对我们的主程序的 流入/流出 流量进行拦截控制,实现类似 ingress 和 egress 网关(这里只是作用与Ingress网关类似)。
引入 envoy 可以实现业务无侵入的管理,但出现一个新问题,如何对每个POD 里的 envoy 配置进行管理,例如对一个应用实现流量mtls加密,访问控制等,手动修改肯定不现实, 这时就引入 Envoy 中提供的 服务发现(service discovery)功能,其支持多种类型的服务发现,如 集群发现服务CDS、虚拟主机发现服务 VHDS 、路由发现服务 RDS 等等,详细的可参考官方文档。
而对 envoy 配置实现管理的正是 polot-agent 这个进程,它是一个service discovery client 一般同 envoy 一起部署在数据面。
pilot-discovery
而 service discovery client 对应的 service discovery server 正是pilot-discovery 的职责,其部署在控制面,它是通过一个 istiod 的pod来提供服务的
# kubectl get pod -n istio-system
NAME                                     READY   STATUS    RESTARTS   AGE
istio-eastwestgateway-556d764dd5-8nxl7   1/1     Running   0          11d
istio-ingressgateway-f68f4b977-9cqvf     1/1     Running   0          11d
istiod-bdc7cf4df-pxshq                   1/1     Running   0          11d
这个 istiod-xxx pod 正是 pilot-discovery 服务, 我们看一下pod描述信息
# kubectl describe pod -n istio-system istiod-bdc7cf4df-pxshq
...
Labels: app=istiod
install.operator.istio.io/owning-resource=unknown
istio=pilot
istio.io/rev=default
operator.istio.io/component=Pilot
pod-template-hash=bdc7cf4df
sidecar.istio.io/inject=false
Controlled By: ReplicaSet/istiod-bdc7cf4df
Containers:
discovery:
Container ID: docker://a1b31072ea2f4b6b4d560f50b83a34896f36959b5b4f117380703f1d6a1572c9
Image: docker.io/istio/pilot:1.11.2
Image ID: docker-pullable://istio/pilot@sha256:14800a3f1aac8579da66d62f0be59fea5e5f77aad6d8d5a971b3d2773911270e
Ports: 8080/TCP, 15010/TCP, 15017/TCP
Host Ports: 0/TCP, 0/TCP, 0/TCP
Args:
discovery
--monitoringAddr=:15014
--log_output_level=default:info
--domain
cluster.local
--keepaliveMaxServerConnectionAge
30m
State: Running
Started: Wed, 12 Apr 2023 12:51:16 +0800
Ready: True
Restart Count: 0
Requests:
cpu: 500m
memory: 2Gi
Readiness: http-get http://:8080/ready delay=1s timeout=5s period=3s #success=1 #failure=3
Environment:
REVISION: default
JWT_POLICY: third-party-jwt
PILOT_CERT_PROVIDER: istiod
POD_NAME: istiod-bdc7cf4df-pxshq (v1:metadata.name)
POD_NAMESPACE: istio-system (v1:metadata.namespace)
SERVICE_ACCOUNT: (v1:spec.serviceAccountName)
KUBECONFIG: /var/run/secrets/remote/config
ENABLE_LEGACY_FSGROUP_INJECTION: false
PILOT_TRACE_SAMPLING: 1
PILOT_ENABLE_PROTOCOL_SNIFFING_FOR_OUTBOUND: true
PILOT_ENABLE_PROTOCOL_SNIFFING_FOR_INBOUND: true
ISTIOD_ADDR: istiod.istio-system.svc:15012
PILOT_ENABLE_ANALYSIS: false
CLUSTER_ID: Kubernetes
Mounts:
/etc/cacerts from cacerts (ro)
/var/run/secrets/istio-dns from local-certs (rw)
/var/run/secrets/kubernetes.io/serviceaccount from kube-api-access-g7z5b (ro)
/var/run/secrets/remote from istio-kubeconfig (ro)
/var/run/secrets/tokens from istio-token (ro)
Conditions:
Type Status
Initialized True
Ready True
ContainersReady True
PodScheduled True
Volumes:
local-certs:
Type: EmptyDir (a temporary directory that shares a pod's lifetime)
Medium: Memory
SizeLimit: <unset>
istio-token:
Type: Projected (a volume that contains injected data from multiple sources)
TokenExpirationSeconds: 43200
cacerts:
Type: Secret (a volume populated by a Secret)
SecretName: cacerts
Optional: true
istio-kubeconfig:
Type: Secret (a volume populated by a Secret)
SecretName: istio-kubeconfig
Optional: true
kube-api-access-g7z5b:
Type: Projected (a volume that contains injected data from multiple sources)
TokenExpirationSeconds: 3607
ConfigMapName: kube-root-ca.crt
ConfigMapOptional: <nil>
DownwardAPI: true
QoS Class: Burstable
Node-Selectors: <none>
Tolerations: node.kubernetes.io/not-ready:NoExecute op=Exists for 300s
node.kubernetes.io/unreachable:NoExecute op=Exists for 300s
Events: <none>
可以看到这个pod是通过 docker.io/istio/pilot:1.11.2 这个镜像创建出来的,对于容器还有一些系统变量,可以想一想它们的使用。
我们知道,在k8s里默认 pod是无法向外提供服务的,一般还需要提供一个其对应的 Service 才可以,这样集群内的应用就可以直接应该这个服务了,如果你想向集群外提供服务的话,可能还需要一个 Ingress 网关才可以。
# kubectl get svc -n istio-system istiod
NAME TYPE CLUSTER-IP EXTERNAL-IP PORT(S) AGE
istiod ClusterIP 10.97.123.72 <none> 15010/TCP,15012/TCP,443/TCP,15014/TCP 11d
# kubectl get svc -n istio-system istiod -o yaml
apiVersion: v1
kind: Service
spec:
clusterIP: 10.97.123.72
clusterIPs:
- 10.97.123.72
internalTrafficPolicy: Cluster
ipFamilies:
- IPv4
ipFamilyPolicy: SingleStack
ports:
- name: grpc-xds
port: 15010
protocol: TCP
targetPort: 15010
- name: https-dns
port: 15012
protocol: TCP
targetPort: 15012
- name: https-webhook
port: 443
protocol: TCP
targetPort: 15017
- name: http-monitoring
port: 15014
protocol: TCP
targetPort: 15014
selector:
app: istiod
istio: pilot
sessionAffinity: None
type: ClusterIP
status:
loadBalancer: {}
与 Service 选择 POD 标签为
spec:
  selector:
    app: istiod
    istio: pilot
这个正是istiod-xxx 这个pod 自身的标签。
这个服务提供了四个端口: 其中 15010 通过 gRPC 提供 XDS 服务发现(xds 表示所有 envoy支持的服务发现类型,如 eds、rds、lds等); 15012 是提供 http-dns 服务的; 15014 端口提供控制平面监控, 这个可以从上面Service 中的 spec.ports.name 看出一些服务类型; 443 端口是一个http服务。
两个模块相关信息
| 模块 | 对应镜像 | 创建Dockerfile | 角色 |
|---|---|---|---|
| pilot-agent | docker.io/istio/proxyv2:1.11.2 | /pilot/docker/Dockefile.proxyv2 | Pod/VM 数据面 |
| pilot-discovery | docker.io/istio/pilot:1.11.2 | /pilot/docker/Dockefile.pilot | 控制面 |
源码分析之pilot-agent
对于 pilot-agent 有几个子命令模块(),但我们主要看一下 pilot-agent proxy这个模块。
pilog-agent proxy 入口文件为 /pilot/cmd/pilot-agent/main.go
// pilot/cmd/pilot-agent/main.go
var (
proxyCmd = &cobra.Command{
Use: "proxy",
Short: "XDS proxy agent",
FParseErrWhitelist: cobra.FParseErrWhitelist{
// Allow unknown flags for backward-compatibility.
UnknownFlags: true,
},
PersistentPreRunE: configureLogging,
RunE: func(c *cobra.Command, args []string) error {
// 1. 从环境变量中读取配置信息并初始化proxy
proxy, err := initProxy(args)
// 2. 服务配置初始化,如集群配置、envoy二进制路径、并发设置、envoy Admin API地址等等
proxyConfig, err := config.ConstructProxyConfig(meshConfigFile, serviceCluster, options.ProxyConfigEnv, concurrency, proxy)
// 3. 一些安装相关的配置,如证书相关,信任域名
secOpts, err := options.NewSecurityOptions(proxyConfig, stsPort, tokenManagerPlugin)
// 4. 安全令牌服务STS
if stsPort > 0 {
stsServer, err := initStsServer(proxy, secOpts.TokenManager)
if err != nil {
return err
}
defer stsServer.Stop()
}
// 5. envoy 配置项初始化,如CA、XDS证书路径
envoyOptions := envoy.ProxyConfig{
LogLevel: proxyLogLevel,
ComponentLogLevel: proxyComponentLogLevel,
LogAsJSON: loggingOptions.JSONEncoding,
NodeIPs: proxy.IPAddresses,
Sidecar: proxy.Type == model.SidecarProxy,
OutlierLogPath: outlierLogPath,
}
agentOptions := options.NewAgentOptions(proxy, proxyConfig)
agent := istio_agent.NewAgent(proxyConfig, agentOptions, secOpts, envoyOptions)
// 6. 启动服务
// Start in process SDS, dns server, xds proxy, and Envoy.
wait, err := agent.Run(ctx)
)
主要工作就是先进行一些proxy的初始化工作,然后调用 agent.Run() 启动服务,重点看一下这个服务实现
// pkg/istio-agent/agent.go
// Simplified SDS setup.
//
// 1. External CA: requires authenticating the trusted JWT AND validating the SAN against the JWT.
// For example Google CA
//
// 2. Indirect, using istiod: using K8S cert.
//
// This is a non-blocking call which returns either an error or a function to await for completion.
func (a *Agent) Run(ctx context.Context) (func(), error) {
// 1. 是否代理dns
if err = a.initLocalDNSServer(); err != nil {
return nil, fmt.Errorf("failed to start local DNS server: %v", err)
}
// 2. 为 workload secrets 创建 SecretManager Client,
// 重点关注 SecretManagerClient.GenerateSecret() 生成secret文件到disk
a.secretCache, err = a.newSecretManager()
// 3. 创建 sdsServer
a.sdsServer = sds.NewServer(a.secOpts, a.secretCache)
// 4. 缓存回调
a.secretCache.SetUpdateCallback(a.sdsServer.UpdateCallback)
// 5. 初始化envoy,并启动服务
if !a.EnvoyDisabled() {
err = a.initializeEnvoyAgent(ctx)
go func() {
...
// This is a blocking call for graceful termination.
a.envoyAgent.Run(ctx)
}()
}
}
初始化 DNSServer
// pkg/istio-agent/agent.go
func (a *Agent) Run(ctx context.Context) (func(), error) {
    // 1. 是否代理dns
    if err = a.initLocalDNSServer(); err != nil {
        return nil, fmt.Errorf("failed to start local DNS server: %v", err)
    }
}
创建 secretManagerClient
// pkg/istio-agent/agent.go
func (a *Agent) Run(ctx context.Context) (func(), error) {
// 2. 为 workload secrets 创建 SecretManager Client,
// 重点关注 SecretManagerClient.GenerateSecret() 生成secret文件到disk
a.secretCache, err = a.newSecretManager()
}
调用 a.newSecretManger() 创建一个 secretManagerClient 对象,其为 citatel 服务的客户端,通过发起 gRPC 请求生成相关证书.
// pkg/istio-agent/agent.go#L627
// newSecretManager creates the SecretManager for workload secrets
func (a *Agent) newSecretManager() (*cache.SecretManagerClient, error) {
...
// 1. 创建 CitadelClient 对象
caClient, err := citadel.NewCitadelClient(a.secOpts, tls, rootCert)
if err != nil {
return nil, err
}
// 2. 创建 SecretManagerClient 对象,这是对 CitadelClient 的封装
return cache.NewSecretManagerClient(caClient, a.secOpts)
}
首先创建一个 CitadelClient 连接对象, 它已经与 gRPC Server (Citadel Server) 建立会话连接,然后对其进行一些封装并返回。
为SDS创建并启动gRPC Server
// pkg/istio-agent/agent.go
func (a *Agent) Run(ctx context.Context) (func(), error) {

    // 3. 创建 sdsServer
    a.sdsServer = sds.NewServer(a.secOpts, a.secretCache)
}
调用 sds.NewServer() 函数为 SDS 创建一个 gRPC Server。
// /security/pkg/nodeagent/sds/server.go#L46
// NewServer creates and starts the Grpc server for SDS.
func NewServer(options *security.Options, workloadSecretCache security.SecretManager) *Server {
    // 1. 创建sds服务封装对象,以便通过gRPC向外提供服务
    s := &Server{stopped: atomic.NewBool(false)}

    // 2. 创建 SDS 服务, workloadSecretCache是SecretManagerClient
    s.workloadSds = newSDSService(workloadSecretCache, options)

    // 3. 初始化sdsservice
    s.initWorkloadSdsService(options)
    sdsServiceLog.Infof("SDS server for workload certificates started, listening on %q", options.WorkloadUDSPath)
    return s
}
一共分三个步骤:
- 创建一个封装好
sdsservice结构体,可以通过gRPC对外提供服务 - 创建真正的
sdsservice, 嵌入到封装结构体的workloadSds字段 - 对
sdsservice服务进行初始化
创建sdsservice 封装对象
第一步
// 第一个字段 stopped
s := &Server{stopped: atomic.NewBool(false)}
创建一个 sds.Server 对象
// /security/pkg/nodeagent/sds/server.go#L35-L43
// Server is the gPRC server that exposes SDS through UDS.
type Server struct {
// sdsservice
workloadSds *sdsservice
// gRPC服务
grpcWorkloadListener net.Listener
grpcWorkloadServer *grpc.Server
stopped *atomic.Bool
}
其主要作用就是为了向外提供 gRPC 服务。
newSDSService
第二步
// 第一个字段 s.workloadSds
s.workloadSds = newSDSService(workloadSecretCache, options)
可以看到真正提供 sdsservice 的是 s.workloadSds字段。
下面我们看一下 newSDSService 的主要实,主要分两部分,首先是创建一介 XdsServer,然后再开起一个 goroutine 用来生成 root cert 或 workload 相关证书
// security/pkg/nodeagent/sds/sdsservice.go#L85-L131
// newSDSService creates Secret Discovery Service which implements envoy SDS API.
func newSDSService(st security.SecretManager, options *security.Options) *sdsservice {
// 1. 创建 xdsServer, 其包含一个 SdsServer 服务端
ret := &sdsservice{
st: st,
stop: make(chan struct{}),
}
ret.XdsServer = NewXdsServer(ret.stop, ret)
// 2. 启动一个 goroutine 生成相关证书,直到成功或收到 ret.stop 信号
// 提前生成证书以优化启动延时,确保 OUTPUT_CERTS 目录可以生成证书
go func() {
// 创建 workload 资源证书并存储在 OUTPUT_CERTS
for {
_, err := st.GenerateSecret(security.WorkloadKeyCertResourceName)
}
// 创建 CAROOT
for {
_, err := st.GenerateSecret(security.RootCertReqResourceName)
}
}()
return ret
}
sdsservice 数据结构为
// /security/pkg/nodeagent/sds/sdsservice.go#L44-L49
type sdsservice struct {
    st security.SecretManager   // secretManageClient 是一个客户端,对应 Secretmanager 接口,只有一个 GenerateSecret() 方法
    XdsServer *xds.DiscoveryServer  // xdsServer 是一个服务端,
    stop      chan struct{}
}
结构体中内嵌了 secretManager 和 XdsServer 两个服务,其服务对应的 grpc proto 文件定义为 https://github.com/envoyproxy/data-plane-api/blob/main/envoy/service/secret/v3/sds.proto 下面将对这两个服务进行介绍。
创建 XdsServer 服务
ret.XdsServer = NewXdsServer(ret.stop, ret)
调用函数 NewXdsServer(stop chan struct{}, gen model.XdsResourceGenerator)返回一个 DiscoveryServer 对象, 其实现了 Envoy xds APIs ,也就是说这个这个对象是用来与 envoy 来进行xds服务通讯的。
函数的第二个参数为 sdsservice 对象,其有且只有一个 sdsservice.Generate() 方法。
// Generate implements the XDS Generator interface. This allows the XDS server to dispatch requests
// for SecretTypeV3 to our server to generate the Envoy response.
func (s *sdsservice) Generate(_ *model.Proxy, _ *model.PushContext, w *model.WatchedResource,
updates *model.PushRequest) (model.Resources, model.XdsLogDetails, error) {
if updates.Full {
resp, err := s.generate(w.ResourceNames)
return resp, pushLog(w.ResourceNames), err
}
names := []string{}
watched := sets.NewSet(w.ResourceNames...)
for i := range updates.ConfigsUpdated {
if i.Kind == gvk.Secret && watched.Contains(i.Name) {
names = append(names, i.Name)
}
}
resp, err := s.generate(names)
return resp, pushLog(names), err
}
可以看出 sdsservice.Generate() 实现了XdsResourceGenerator 接口,最终是通过调用 s.generate() 将 SecretItem 对象转化为 envoy 的 tls.Secret 类型,这允许 XDS 服务器将 SecretTypeV3 的请求发送到我们的服务器以生成 Envoy 响应。
// XdsResourceGenerator creates the response for a typeURL DiscoveryRequest. If no generator is associated
// with a Proxy, the default (a networking.core.ConfigGenerator instance) will be used.
// The server may associate a different generator based on client metadata. Different
// WatchedResources may use same or different Generator.
// Note: any errors returned will completely close the XDS stream. Use with caution; typically and empty
// or no response is preferred.
type XdsResourceGenerator interface {
    Generate(proxy *Proxy, push *PushContext, w *WatchedResource, updates *PushRequest) (Resources, XdsLogDetails, error)
}
通过这个方法可以实现对服务发现的请求与响应,也就是说凡是实现了这个接口,就表示可以生成envoy服务发现的响应内容,下面将对其进行介绍。
这里顺便说一下,对于 sdsservice.st 字段,则实现了另一个接口 SecretManager, 其也只有一个方法,名为 GenerateSecret(), 注意两个方法的区别。
我们看一下 NewXdsServer() 具体实现
// security/pkg/nodeagent/sds/sdsservice.go#L54-L83
func NewXdsServer(stop chan struct{}, gen model.XdsResourceGenerator) *xds.DiscoveryServer {
// 1. 创建一个简单的 xdsServer
s := xds.NewXDS(stop)
// 2. 注册 sdsservice
s.DiscoveryServer.Generators = map[string]model.XdsResourceGenerator{
    v3.SecretType: gen,
}
// 3. 自定义控制函数,用来控制哪些push可以跳过,哪些可以不发送或更新
s.DiscoveryServer.ProxyNeedsPush = func(proxy *model.Proxy, req *model.PushRequest) bool {
// Empty changes means "all"
if len(req.ConfigsUpdated) == 0 {
return true
}
proxy.RLock()
wr := proxy.WatchedResources[v3.SecretType]
proxy.RUnlock()
if wr == nil {
return false
}
names := sets.NewSet(wr.ResourceNames...)
found := false
for name := range model.ConfigsOfKind(req.ConfigsUpdated, gvk.Secret) {
if names.Contains(name.Name) {
found = true
}
}
return found
}
// 4. 启动服务发现服务
    s.DiscoveryServer.Start(stop)
return s.DiscoveryServer
}
大概分为四个步骤:
- 创建一个最基本的
DiscoveryServer,与 Istiod 代码是一样的,后端存储使用的是 Memory - 注册
DiscoveryServer.Generators, 也就是我们上面讲的 [sdsservice]( 服务 - 自定义控制函数,用来控制哪些push可以跳过,哪些可以不发送或更新
- 启动
DiscoveryServer服务
创建 XDS 服务
重点看一下 xds.NewXDS() 的实现
// pilot/pkg/xds/simple.go#L70-L139
func NewXDS(stop chan struct{}) *SimpleServer {
// Prepare a working XDS server, with aggregate config and registry stores and a memory store for each.
// 1. 环境配置,初始化的东西比较的多
env := &model.Environment{
PushContext: model.NewPushContext(),
}
// 2. 服务网格配置, 重点关注! 有许多与envoy代理有关的配置项, 见 meshconfig.MeshConfig{}
mc := mesh.DefaultMeshConfig()
env.Watcher = mesh.NewFixedWatcher(&mc)
env.PushContext.Mesh = env.Watcher.Mesh()
env.Init()
// 3. 创建 DiscoveryServer 服务端,对应的正是 istio-system 命令空间中的 istiod 服务
ds := NewDiscoveryServer(env, nil, "istiod", "istio-system")
ds.InitGenerators(env, "istio-system")
ds.CachesSynced()
// Config will have a fixed format:
// - aggregate store
// - one primary (local) memory config
// Additional stores can be added dynamically - for example by push or reference from a server.
// This is used to implement and test XDS federation (which is not yet final).
// 4. store 配置
// In-memory config store, controller and istioConfigStore
schemas := collections.Pilot
store := memory.Make(schemas)
s := &SimpleServer{
DiscoveryServer: ds,
}
s.syncCh = make(chan string, len(schemas.All()))
// 客户端监控器,用来在客户端上分发变化事件
configController := memory.NewController(store)
s.MemoryConfigStore = model.MakeIstioStore(configController)
// 5. 注册服务发现聚合控制器,一个外部 External ,一个 Mem
// Endpoints/Clusters - using the config store for ServiceEntries
serviceControllers := aggregate.NewController(aggregate.Options{})
serviceEntryStore := serviceentry.NewServiceDiscovery(configController, s.MemoryConfigStore, ds)
serviceEntryRegistry := serviceregistry.Simple{
ProviderID: "External",
Controller: serviceEntryStore,
ServiceDiscovery: serviceEntryStore,
}
serviceControllers.AddRegistry(serviceEntryRegistry)
sd := controllermemory.NewServiceDiscovery(nil)
sd.EDSUpdater = ds
ds.MemRegistry = sd
serviceControllers.AddRegistry(serviceregistry.Simple{
ProviderID: "Mem",
ServiceDiscovery: sd,
Controller: sd.Controller,
})
env.ServiceDiscovery = serviceControllers
go configController.Run(stop)
// configStoreCache - with HasSync interface
aggregateConfigController, err := configaggregate.MakeCache([]model.ConfigStoreCache{
configController,
})
if err != nil {
log.Fatala("Creating aggregate config ", err)
}
// TODO: fix the mess of store interfaces - most are too generic for their own good.
s.ConfigStoreCache = aggregateConfigController
env.IstioConfigStore = model.MakeIstioStore(aggregateConfigController)
return s
}
创建一个最基本的服务发现服务,代码与 istiod 相同,只是后端存储为内存。这里涉及的概念比较的多,需要慢慢理解。
注册 sdsservice 服务
s.DiscoveryServer.Generators = map[string]model.XdsResourceGenerator{
v3.SecretType: gen,
}
自定义push 过滤函数
// 3. 自定义控制函数,用来控制哪些push可以跳过,哪些可以不发送或更新
s.DiscoveryServer.ProxyNeedsPush = func(proxy *model.Proxy, req *model.PushRequest) bool {
// Empty changes means "all"
if len(req.ConfigsUpdated) == 0 {
return true
}
proxy.RLock()
wr := proxy.WatchedResources[v3.SecretType]
proxy.RUnlock()
if wr == nil {
return false
}
names := sets.NewSet(wr.ResourceNames...)
found := false
for name := range model.ConfigsOfKind(req.ConfigsUpdated, gvk.Secret) {
if names.Contains(name.Name) {
found = true
}
}
return found
}
自定义控制函数,用来控制哪些push可以跳过,哪些可以不发送或更新, 返回 true 表示允许 push。
启动 DiscoveryServer 服务
// 4. 启动服务发现服务
s.DiscoveryServer.Start(stop)
我看再看一下 s.DiscoveryServer.Start() 实现, 这个很重要
// /pilot/pkg/xds/discovery.go#L255-L260
func (s *DiscoveryServer) Start(stopCh <-chan struct{}) {
// 控制器运行
go s.WorkloadEntryController.Run(stopCh)
// 调用 push以使用 ADS 推送的方式对配置变更
go s.handleUpdates(stopCh)
// prometheus 指标更新,默认每10s更新一次
go s.periodicRefreshMetrics(stopCh)
go s.sendPushes(stopCh)
}
至于 Start() 方法中的每一个服务都开启了一个 goroutine 运行.
s.WorkloadEntryController.Run() 表示 Controller 运行,这里指的是 /pilot/pkg/controller/workloaddentry/workloadentry_controller.go
这里不再做详细介绍,可自行了解。
总结
总结起来就是创建一个 XDS 服务发现服务,并将 sdsservice 注册到 XDS 里,同时再自定义一个是否允许 push 的函数,最后启动 XDS 服务。
生成 Secret
接着我们介绍一个 newSDSService() 中的生成 secret 部分,在此之前,先看一下官网 istio 中的 身份和证书管理内容,参考:
这里调用 st.GenerateSecret() 以生成 workload证书 和 CAROOT 证书,看下其实现
// security/pkg/nodeagent/cache/secretcache.go#L242-L317
// GenerateSecret passes the cached secret to SDS.StreamSecrets and SDS.FetchSecret.
func (sc *SecretManagerClient) GenerateSecret(resourceName string) (secret *security.SecretItem, err error) {
// 函数返回前,需要存储所有的 secret 到磁盘
defer func() {
if secret == nil || err != nil {
return
}
sc.outputMutex.Lock()
if resourceName == security.RootCertReqResourceName || resourceName == security.WorkloadKeyCertResourceName {
// 生成 key.pem、chert-chain.pem 或 root-cert.pem,这里调用 file.AtomicWrite() 方法以原子性方式生成证书相关文件
if err := nodeagentutil.OutputKeyCertToDir(sc.configOptions.OutputKeyCertToDir, secret.PrivateKey,
secret.CertificateChain, secret.RootCert); err != nil {
cacheLog.Errorf("error when output the resource: %v", err)
} else {
resourceLog(resourceName).Debugf("output the resource to %v", sc.configOptions.OutputKeyCertToDir)
}
}
sc.outputMutex.Unlock()
}()
// 1. 首先读取文件内容并生成 secret,如果读取成功则直接返回
if sdsFromFile, ns, err := sc.generateFileSecret(resourceName); sdsFromFile {
if err != nil {
return nil, err
}
return ns, nil
}
// 2. 从 secretManager client 的 cache 中接收 workload-certificate/workload-root
ns := sc.getCachedSecret(resourceName)
if ns != nil {
return ns, nil
}
// 以下的甩生成secret步骤都需要先加锁
t0 := time.Now()
sc.generateMutex.Lock()
defer sc.generateMutex.Unlock()
// 2.1.在发送请求之前再次从 cache 获取,以避免 CA 不堪重负,找到直接返回
ns = sc.getCachedSecret(resourceName)
if ns != nil {
return ns, nil
}
// 2.2. 向CA发送请求以获取新的工作负载证书
// send request to CA to get new workload certificate
ns, err = sc.generateNewSecret(resourceName)
// 2.3. 将新生成的 secret 存储到 secretCache 中并触发工作负载证书的定期轮换
// Store the new secret in the secretCache and trigger the periodic rotation for workload certificate
sc.registerSecret(*ns)
// 证书同步
if resourceName == security.RootCertReqResourceName {
ns.RootCert = sc.mergeConfigTrustBundle(ns.RootCert)
} else {
// 如果定期证书刷新导致发现新的 RootCert,则触发 ROOTCA 请求以刷新 trust anchor
// If periodic cert refresh resulted in discovery of a new root, trigger a ROOTCA request to refresh trust anchor
oldRoot := sc.cache.GetRoot()
if !bytes.Equal(oldRoot, ns.RootCert) {
// Root cert 发生变化,重新轮换根证书。我们存储 oldRoot 只是为了比较而不是为了服务
sc.cache.SetRoot(ns.RootCert)
// 执行 RootCert 更新回调
sc.CallUpdateCallback(security.RootCertReqResourceName)
}
}
return ns, nil
}
首先调用 generateFileSecret() 试图文件中生成secret,如果成功则直接返回。
先看一下 security.SecretItem ,它是 memory 存储中的 secret 缓存项。其的数据结构
// SecretItem is the cached item in in-memory secret store.
type SecretItem struct {
CertificateChain []byte
PrivateKey []byte
RootCert []byte
// ResourceName passed from envoy SDS discovery request.
// "ROOTCA" for root cert request, "default" for key/cert request.
ResourceName string
CreatedTime time.Time
ExpireTime time.Time
}
对于 ResourceName , 如果 secret 类型为 ROOTCA 则为 default, 否则为 key/cert 。
从File中创建 secret
在此之前先看一下 SecretItem 的数据结构
// SecretItem is the cached item in in-memory secret store.
type SecretItem struct {
CertificateChain []byte
PrivateKey []byte
RootCert []byte
// ResourceName passed from envoy SDS discovery request.
// "ROOTCA" for root cert request, "default" for key/cert request.
ResourceName string
CreatedTime time.Time
ExpireTime time.Time
}
其中 RootCert 是根证书,而 CertificateChain 和 PrivateKey 是常用的服务证书,而后面我们一般会根据 ResourceName 来判断是哪一类的证书。
并读取相关证书文件(或从resourceName中分析)从而生成 security.SecretItem 对象,并其作为 sds response 使用。
// security/pkg/nodeagent/cache/secretcache.go#L463-529
func (sc *SecretManagerClient) generateFileSecret(resourceName string) (bool, *security.SecretItem, error) {
// 证书配置文件,其声明在 /security/pkg/nodeagent/cache/secretcache.go#L175-179
cf := sc.existingCertificateFile
// 检查路径是否合法
outputToCertificatePath, ferr := file.DirEquals(filepath.Dir(cf.CertificatePath), sc.configOptions.OutputKeyCertToDir)
if ferr != nil {
return false, nil, ferr
}
// 当在一个众所周知的路径里存在 root cert 证书(security.DefaultRootCertFilePath 定义) 或者
// cert/key 证书(security.DefaultCertChainFilePath 和 security.DefaultKeyFilePath),则它们将作为 SDS response 使用
sdsFromFile := false
var err error
var sitem *security.SecretItem
switch {
// 读取 root certificate (resourceName = ROOTCA)
case resourceName == security.RootCertReqResourceName && sc.rootCertificateExist(cf.CaCertificatePath) && !outputToCertificatePath:
sdsFromFile = true
if sitem, err = sc.generateRootCertFromExistingFile(cf.CaCertificatePath, resourceName, true); err == nil {
// If retrieving workload trustBundle, then merge other configured trustAnchors in ProxyConfig
sitem.RootCert = sc.mergeConfigTrustBundle(sitem.RootCert)
sc.addFileWatcher(cf.CaCertificatePath, resourceName)
}
// 读取 workload certificate (resourceName = default)
case resourceName == security.WorkloadKeyCertResourceName && sc.keyCertificateExist(cf.CertificatePath, cf.PrivateKeyPath) && !outputToCertificatePath:
sdsFromFile = true
if sitem, err = sc.generateKeyCertFromExistingFiles(cf.CertificatePath, cf.PrivateKeyPath, resourceName); err == nil {
// Adding cert is sufficient here as key can't change without changing the cert.
sc.addFileWatcher(cf.CertificatePath, resourceName)
}
default:
// 如果 resourceName 是一个证书内容字符串,则生成一个证书配置对象 model.SdsCertificateConfig, 然后再按上面的方法解析为 SecretItem
// Check if the resource name refers to a file mounted certificate.
// Currently used in destination rules and server certs (via metadata).
// Based on the resource name, we need to read the secret from a file encoded in the resource name.
cfg, ok := model.SdsCertificateConfigFromResourceName(resourceName)
sdsFromFile = ok
switch {
case ok && cfg.IsRootCertificate():
if sitem, err = sc.generateRootCertFromExistingFile(cfg.CaCertificatePath, resourceName, false); err == nil {
sc.addFileWatcher(cfg.CaCertificatePath, resourceName)
}
case ok && cfg.IsKeyCertificate():
if sitem, err = sc.generateKeyCertFromExistingFiles(cfg.CertificatePath, cfg.PrivateKeyPath, resourceName); err == nil {
// Adding cert is sufficient here as key can't change without changing the cert.
sc.addFileWatcher(cfg.CertificatePath, resourceName)
}
}
}
if sdsFromFile {
if err != nil {
cacheLog.Errorf("%s failed to generate secret for proxy from file: %v",
logPrefix, err)
numFileSecretFailures.Increment()
return sdsFromFile, nil, err
}
cacheLog.WithLabels("resource", resourceName).Info("read certificate from file")
// We do not register the secret. Unlike on-demand CSRs, there is nothing we can do if a file
// cert expires; there is no point sending an update when its near expiry. Instead, a
// separate file watcher will ensure if the file changes we trigger an update.
return sdsFromFile, sitem, nil
}
return sdsFromFile, nil, nil
}
否则调用 sc.generateNewSecret() 生成一个新的 workload certificate, 存储在 secretCache 中并触发工作负载证书的定期轮换。
生成全新的 Secret
下面先是生成 CSR 和 key ,接着调用 CSRSign() 函数通过 gRPC 协议将 csr发送到 citadel server ,取到证书链信息。先看一下官方提供的证书生成架构图
Istio 通过以下流程提供密钥和证书:
istiod提供 gRPC 服务以接受证书签名请求(CSRs)。istio-agent在启动时创建私钥和 CSR,然后将 CSR 及其凭据发送到istiod进行签名。istiodCA 验证 CSR 中携带的凭据,成功验证后签署 CSR 以生成证书。- 当工作负载启动时,Envoy 通过秘密发现服务(SDS)API 向同容器内的
istio-agent发送证书和密钥请求。 istio-agent通过 Envoy SDS API 将从istiod收到的证书和密钥发送给 Envoy。istio-agent监控工作负载证书的过期时间。上述过程会定期重复进行证书和密钥轮换。
熟悉了证书生成流程 ,我们再看一下它的实现。
这里的第 2 步骤正是我们下面讲到的实现部分。
func (sc *SecretManagerClient) generateNewSecret(resourceName string) (*security.SecretItem, error) {
var trustBundlePEM []string = []string{}
var rootCertPEM []byte
// sc.caClient 是由 citadel.NewCitadelClient()创建的,它是 citadel 服务的客户端
if sc.caClient == nil {
return nil, fmt.Errorf("attempted to fetch secret, but ca client is nil")
}
t0 := time.Now()
logPrefix := cacheLogPrefix(resourceName)
// 1. 生成证书的相关配置,如 Host, NotBefore, NotAfter、DNSNames 等, 使用到了 spiffe
csrHostName := &spiffe.Identity{
TrustDomain: sc.configOptions.TrustDomain, // 联邦信任根域,多数配置是通过读取环境变量获取的,见 main.go 函数
Namespace: sc.configOptions.WorkloadNamespace,
ServiceAccount: sc.configOptions.ServiceAccount,
}
options := pkiutil.CertOptions{
Host: csrHostName.String(),
RSAKeySize: keySize, // 2048位
PKCS8Key: sc.configOptions.Pkcs8Keys,
ECSigAlg: pkiutil.SupportedECSignatureAlgorithms(sc.configOptions.ECCSigAlg),
}
// 2. 生成 csr 和 key ,将其发送到CA,这里为 istiod
// Generate the cert/key, send CSR to CA.
csrPEM, keyPEM, err := pkiutil.GenCSR(options)
if err != nil {
cacheLog.Errorf("%s failed to generate key and certificate for CSR: %v", logPrefix, err)
return nil, err
}
numOutgoingRequests.With(RequestType.Value(monitoring.CSR)).Increment()
timeBeforeCSR := time.Now()
// 3. 向 citadel 服务发送 CSR 请求, 并获取证书链,链中的第一个证书是最后的leaf cert叶子证书,而最后一个证书是root cert
certChainPEM, err := sc.caClient.CSRSign(csrPEM, int64(sc.configOptions.SecretTTL.Seconds()))
if err == nil {
// 接收 RootCert,这行可省略,因为 istio 不支持
trustBundlePEM, err = sc.caClient.GetRootCertBundle()
}
csrLatency := float64(time.Since(timeBeforeCSR).Nanoseconds()) / float64(time.Millisecond)
outgoingLatency.With(RequestType.Value(monitoring.CSR)).Record(csrLatency)
if err != nil {
numFailedOutgoingRequests.With(RequestType.Value(monitoring.CSR)).Increment()
return nil, err
}
// 4. 将证书链里的所有证书内容合并到在一起,生成一个证书文件
certChain := concatCerts(certChainPEM)
var expireTime time.Time
if expireTime, err = nodeagentutil.ParseCertAndGetExpiryTimestamp(certChain); err != nil {
return nil, fmt.Errorf("failed to extract expire time from server certificate in CSR response: %v", err)
}
if len(trustBundlePEM) > 0 {
rootCertPEM = concatCerts(trustBundlePEM)
} else {
// 从证书链中获取 root cert,其位于证书链中的最后元素位置
// If CA Client has no explicit mechanism to retrieve CA root, infer it from the root of the certChain
rootCertPEM = []byte(certChainPEM[len(certChainPEM)-1])
}
// 证书令牌
return &security.SecretItem{
CertificateChain: certChain,
PrivateKey: keyPEM,
ResourceName: resourceName,
CreatedTime: time.Now(),
ExpireTime: expireTime,
RootCert: rootCertPEM,
}, nil
}
基本流程已在代码里注释过了,其实很简单的。这里除了对应用 envoy 配置基本都覆盖到了
文中的 sc.caClient 数据结构为
type CitadelClient struct {
enableTLS bool
caTLSRootCert []byte
client pb.IstioCertificateServiceClient
conn *grpc.ClientConn
provider *caclient.TokenProvider
opts *security.Options
usingMtls *atomic.Bool
}
// CSR Sign calls Citadel to sign a CSR.
func (c *CitadelClient) CSRSign(csrPEM []byte, certValidTTLInSec int64) ([]string, error) {
req := &pb.IstioCertificateRequest{
Csr: string(csrPEM),
ValidityDuration: certValidTTLInSec,
}
if err := c.reconnectIfNeeded(); err != nil {
return nil, err
}
ctx := metadata.NewOutgoingContext(context.Background(), metadata.Pairs("ClusterID", c.opts.ClusterID))
// gRPC 请求证书
resp, err := c.client.CreateCertificate(ctx, req)
if err != nil {
return nil, fmt.Errorf("create certificate: %v", err)
}
if len(resp.CertChain) <= 1 {
return nil, errors.New("invalid empty CertChain")
}
return resp.CertChain, nil
}
其实现了 security.Client 接口,此接口定义了客户端需要实现以与 CA 进行 CSR 对话。Agent 将创建一个密钥对和一个 CSR,并使用此接口的实现来获取已签名的证书。这里发起请求的方法为 resp, err := c.client.CreateCertificate(ctx, req)。
sdsServer 服务初始化
第三步
s.initWorkloadSdsService(options)
sdsServiceLog.Infof("SDS server for workload certificates started, listening on %q", options.WorkloadUDSPath)
初始化过程
// https://github.com/istio/istio/blob/1.11.3/security/pkg/nodeagent/sds/server.go#L84-L128
func (s *Server) initWorkloadSdsService(options *security.Options) {
// 1. 第三个字段 s.grpcWorkloadServer
s.grpcWorkloadServer = grpc.NewServer(s.grpcServerOptions()...)
s.workloadSds.register(s.grpcWorkloadServer)
//2. 第四个字段 s.grpcWorkloadListener, 到此为止 sds.Server 结构体的四个字段全部初始化完成了
var err error
s.grpcWorkloadListener, err = uds.NewListener(options.WorkloadUDSPath)
if err != nil {
sdsServiceLog.Errorf("Failed to set up UDS path: %v", err)
}
// 2. 启动gRPC服务(goroutine),最多重试5次,每次间隔为上次间隔时间的2倍
go func() {
sdsServiceLog.Info("Starting SDS grpc server")
waitTime := time.Second
started := false
for i := 0; i < maxRetryTimes; i++ {
if s.stopped.Load() {
return
}
serverOk := true
setUpUdsOK := true
if s.grpcWorkloadListener == nil {
if s.grpcWorkloadListener, err = uds.NewListener(options.WorkloadUDSPath); err != nil {
sdsServiceLog.Errorf("SDS grpc server for workload proxies failed to set up UDS: %v", err)
setUpUdsOK = false
}
}
if s.grpcWorkloadListener != nil {
if err = s.grpcWorkloadServer.Serve(s.grpcWorkloadListener); err != nil {
sdsServiceLog.Errorf("SDS grpc server for workload proxies failed to start: %v", err)
serverOk = false
}
}
if serverOk && setUpUdsOK {
sdsServiceLog.Info("SDS grpc server started")
started = true
break
}
time.Sleep(waitTime)
waitTime *= 2
}
if !started {
sdsServiceLog.Warn("SDS grpc server could not be started")
}
}()
}
- 通过
s.grpcWorkloadServer = grpc.NewServer(s.grpcServerOptions()...)创建一个 gRPC Service - 调用
s.workloadSds.register(s.grpcWorkloadServer)将sdsservice注册为 gRPC Server 服务 `// register adds the SDS handle to the grpc server
func (s *sdsservice) register(rpcs *grpc.Server) {
sds.RegisterSecretDiscoveryServiceServer(rpcs, s)
}3. 注册一个WorkloadListener 对象。通过调用 [uds.NewListener()][9]函数,读取本地的 unix socket` 文件创建。
secretManagerClient 事件回调
// pkg/istio-agent/agent.go
func (a *Agent) Run(ctx context.Context) (func(), error) {

    // 4. 缓存回调
    a.secretCache.SetUpdateCallback(a.sdsServer.UpdateCallback)
}
当 cache.SecretManagerClient 变更时触发事件 a.sdsService.UpdateCallback 回调
这里 s.sdsServer.UpdateCallback() 实现源码为
// /security/pkg/nodeagent/sds/server.go#L54-L65
func (s *Server) UpdateCallback(resourceName string) {
    if s.workloadSds == nil {
        return
    }
    s.workloadSds.XdsServer.Push(&model.PushRequest{
        Full: false,
        ConfigsUpdated: map[model.ConfigKey]struct{}{
            {Kind: gvk.Secret, Name: resourceName}: {},
        },
        Reason: []model.TriggerReason{model.SecretTrigger},
    })
}// /security/pkg/nodeagent/sds/server.go#L54-L65<br>func (s *Server) UpdateCallback(resourceName string) {<br>    if s.workloadSds == nil {<br>        return<br>    }<br>    s.workloadSds.XdsServer.Push(&model.PushRequest{<br>        Full: false,<br>        ConfigsUpdated: map[model.ConfigKey]struct{}{<br>            {Kind: gvk.Secret, Name: resourceName}: {},<br>        },<br>        Reason: []model.TriggerReason{model.SecretTrigger},<br>    })<br>}
代理所有envoy到Istiod的XDS Requests 流量
控制开关为环境变量 PROXY_XDS_VIA_AGENT
if a.cfg.ProxyXDSViaAgent {
		a.xdsProxy, err = initXdsProxy(a)
		if err != nil {
			return nil, fmt.Errorf("failed to start xds proxy: %v", err)
		}
		if a.cfg.ProxyXDSDebugViaAgent {
			err = a.xdsProxy.initDebugInterface()
			if err != nil {
				return nil, fmt.Errorf("failed to start istio tap server: %v", err)
			}
		}
	}
初始化envoy并启动服务
// pkg/istio-agent/agent.go
func (a *Agent) Run(ctx context.Context) (func(), error) {
// 5. 初始化envoy,并启动服务
if !a.EnvoyDisabled() {
err = a.initializeEnvoyAgent(ctx)
if err != nil {
return nil, fmt.Errorf("failed to start envoy agent: %v", err)
}
a.wg.Add(1)
go func() {
defer a.wg.Done()
if a.cfg.EnableDynamicBootstrap {
start := time.Now()
var err error
select {
case err = <-a.envoyWaitCh:
case <-ctx.Done():
// Early cancellation before envoy started.
return
}
if err != nil {
log.Errorf("failed to write updated envoy bootstrap: %v", err)
return
}
log.Infof("received server-side bootstrap in %v", time.Since(start))
}
// This is a blocking call for graceful termination.
a.envoyAgent.Run(ctx)
}()
} else if a.WaitForSigterm() {
// wait for SIGTERM and perform graceful shutdown
stop := make(chan os.Signal)
signal.Notify(stop, syscall.SIGTERM)
a.wg.Add(1)
go func() {
defer a.wg.Done()
<-stop
}()
}
}
首先是调用 a.initalizeEnvoyAgent() 初始化 envoy 服务相关配置
// pkg/istio-agent/agent.go
func (a *Agent) initializeEnvoyAgent(ctx context.Context) error {
	// 1. envoy 启动参数
	...
	a.envoyOpts.BinaryPath = a.proxyConfig.BinaryPath
	a.envoyOpts.AdminPort = a.proxyConfig.ProxyAdminPort
	a.envoyOpts.DrainDuration = a.proxyConfig.DrainDuration
	a.envoyOpts.ParentShutdownDuration = a.proxyConfig.ParentShutdownDuration
	a.envoyOpts.Concurrency = a.proxyConfig.Concurrency.GetValue()

	// 根据一系列启动参数创建一个envoy实例
	envoyProxy := envoy.NewProxy(a.envoyOpts)

	// 创建一个 proxy agent对象, 实现 Proxy 接口。稍候调用 a.envoyAgent.Run()
	a.envoyAgent = envoy.NewAgent(envoyProxy, drainDuration)

	// Simulate an xDS request for a bootstrap
	if a.cfg.EnableDynamicBootstrap {
	    go func(){
		_ = a.xdsProxy.handleStream(request)
	    }()
	}

}
这里主要是一些 envoy 服务启动命令的相关参数收集工作。
接着调用 a.envoyAgent.Run() 启动 envoy 服务,这是最后一步,等服务启动完整个服务就开始工作了。
// pkg/envoy/agent.go#L73-L100
// Run starts the envoy and waits until it terminates.
func (a *Agent) Run(ctx context.Context) {
	log.Info("Starting proxy agent")

	go a.runWait(0, a.abortCh)

	select {
	case status := <-a.statusCh:
		if status.err != nil {
			if status.err.Error() == errOutOfMemory {
				log.Warnf("Envoy may have been out of memory killed. Check memory usage and limits.")
			}
			log.Errorf("Epoch %d exited with error: %v", status.epoch, status.err)
		} else {
			log.Infof("Epoch %d exited normally", status.epoch)
		}

		log.Infof("No more active epochs, terminating")
	case <-ctx.Done():
		a.terminate()
		status := <-a.statusCh
		if status.err == errAbort {
			log.Infof("Epoch %d aborted normally", status.epoch)
		} else {
			log.Warnf("Epoch %d aborted abnormally", status.epoch)
		}
		log.Info("Agent has successfully terminated")
	}
}

// runWait runs the start-up command as a go routine and waits for it to finish
func (a *Agent) runWait(epoch int, abortCh <-chan error) {
	log.Infof("Epoch %d starting", epoch)

	// 启动envoy进程
	err := a.proxy.Run(epoch, abortCh)

	// 删除envoy配置文件
	a.proxy.Cleanup(epoch)
	a.statusCh <- exitStatus{epoch: epoch, err: err}
}
调用 go a.runWait(0, a.abortCh) 开始首次新生代,再通过调用 a.proxy.Run() 启动服务。
// pkg/envoy/proxy.go#L169-204
func (e *envoy) Run(epoch int, abort <-chan error) error {
	// 启动 envoy进程
	args := e.args(e.ConfigPath, epoch, istioBootstrapOverrideVar.Get())
	log.Infof("Envoy command: %v", args)

	/* #nosec */
	cmd := exec.Command(e.BinaryPath, args...)
	cmd.Stdout = os.Stdout
	cmd.Stderr = os.Stderr
	if e.AgentIsRoot {
		cmd.SysProcAttr = &syscall.SysProcAttr{}
		cmd.SysProcAttr.Credential = &syscall.Credential{
			Uid: 1337,
			Gid: 1337,
		}
	}

	if err := cmd.Start(); err != nil {
		return err
	}
	done := make(chan error, 1)
	go func() {
		done <- cmd.Wait()
	}()

	select {
	case err := <-abort:
		log.Warnf("Aborting epoch %d", epoch)
		if errKill := cmd.Process.Kill(); errKill != nil {
			log.Warnf("killing epoch %d caused an error %v", epoch, errKill)
		}
		return err
	case err := <-done:
		return err
	}
}
参考
*https://istio.io/latest/docs/reference/commands/pilot-agent/ *https://istio.io/latest/docs/reference/commands/pilot-discovery/ *https://github.com/istio/istio/blob/1.11.3/pkg/istio-agent/README.md *https://istio.io/latest/zh/docs/ops/deployment/architecture/