Goland+dlv远程调试
admin
- 5 minutes read - 909 words环境
远程服务器(Linux):192.168.245.137
本地(macOS):GoLand
目的
远程调试就是使用使用本地 IDE 来调试远程服务器上的服务。本地打断点,调用远程服务的接口。本地就会停在断点。
为什么需要远程调试呢?主要有以下几点原因:
- 运行环境:有时候本机不具备调试环境,如开发的程序依赖太多组件,而这些组件在当前机器并不被支持
- 性能:一般远程服务器的配置都比较高,编译速度也比较快。而开发机器的配置相对要低一些,每次修改程序都要重新编译,非常的消耗时间。
- 硬盘空间:编译时产生大量的中间临时文件,多达10个G左右,如果本机硬盘空间不足的话,则根本就没有办法进行本地调试
我这里用的系统是macOS,硬盘只有128G大小,硬盘空间非常的紧张,vmware虚拟机占用了30个G, 在虚拟机里编译时发现期间产生的临时文件达到6个G,硬盘空间已经不远远不够,所以选择使用远程调试这种方式。
这些调试方式对于k8s 开发者来讲应该比较常见,如 调试 kube-apiserver 组件。
安装 dlv(远程)
首先我们在远程服务器安装 Golang 环境 和 dlv 命令。
这里默认已经安装好了 Golang 环境,版本为1.20,如果没有安装的话,则需要先安装一下,参考 https://go.dev
安装 dlv 命令参考 https://github.com/go-delve/delve/tree/master/Documentation/installation
# go install github.com/go-delve/delve/cmd/dlv@latest
查看一下 dlv 的用法
# dlv -h
Delve is a source level debugger for Go programs.

Delve enables you to interact with your program by controlling the execution of the process,
evaluating variables, and providing information of thread / goroutine state, CPU register state and more.

The goal of this tool is to provide a simple yet powerful interface for debugging Go programs.

Pass flags to the program you are debugging using `--`, for example:

`dlv exec ./hello -- server --config conf/config.toml`

Usage:
  dlv [command]

Available Commands:
  attach      Attach to running process and begin debugging.
  connect     Connect to a headless debug server with a terminal client.
  core        Examine a core dump.
  dap         Starts a headless TCP server communicating via Debug Adaptor Protocol (DAP).
  debug       Compile and begin debugging main package in current directory, or the package specified.
  exec        Execute a precompiled binary, and begin a debug session.
  help        Help about any command
  run         Deprecated command. Use 'debug' instead.
  test        Compile test binary and begin debugging program.
  trace       Compile and begin tracing program.
  version     Prints version.

Flags:
      --accept-multiclient               Allows a headless server to accept multiple client connections via JSON-RPC or DAP.
      --allow-non-terminal-interactive   Allows interactive sessions of Delve that don't have a terminal as stdin, stdout and stderr
      --api-version int                  Selects JSON-RPC API version when headless. New clients should use v2. Can be reset via RPCServer.SetApiVersion. See Documentation/api/json-rpc/README.md. (default 1)
      --backend string                   Backend selection (see 'dlv help backend'). (default "default")
      --build-flags string               Build flags, to be passed to the compiler. For example: --build-flags="-tags=integration -mod=vendor -cover -v"
      --check-go-version                 Exits if the version of Go in use is not compatible (too old or too new) with the version of Delve. (default true)
      --disable-aslr                     Disables address space randomization
      --headless                         Run debug server only, in headless mode. Server will accept both JSON-RPC or DAP client connections.
  -h, --help                             help for dlv
      --init string                      Init file, executed by the terminal client.
  -l, --listen string                    Debugging server listen address. (default "127.0.0.1:0")
      --log                              Enable debugging server logging.
      --log-dest string                  Writes logs to the specified file or file descriptor (see 'dlv help log').
      --log-output string                Comma separated list of components that should produce debug output (see 'dlv help log')
      --only-same-user                   Only connections from the same user that started this instance of Delve are allowed to connect. (default true)
  -r, --redirect stringArray             Specifies redirect rules for target process (see 'dlv help redirect')
      --wd string                        Working directory for running the program.

Additional help topics:
  dlv backend  Help about the --backend flag.
  dlv log      Help about logging flags.
  dlv redirect Help about file redirection.

Use "dlv [command] --help" for more information about a command.
下面我们会用到 dlv exec 这个命令。
源码同步设置(本地)
这里为了方便在服务器上可以直接进行程序编译,因此将本地Git 仓库的代码自动同步到远程服务器上。如果你要地地编译,然后再将编译后的文件上传到服务器的话,则这一步可以省略。
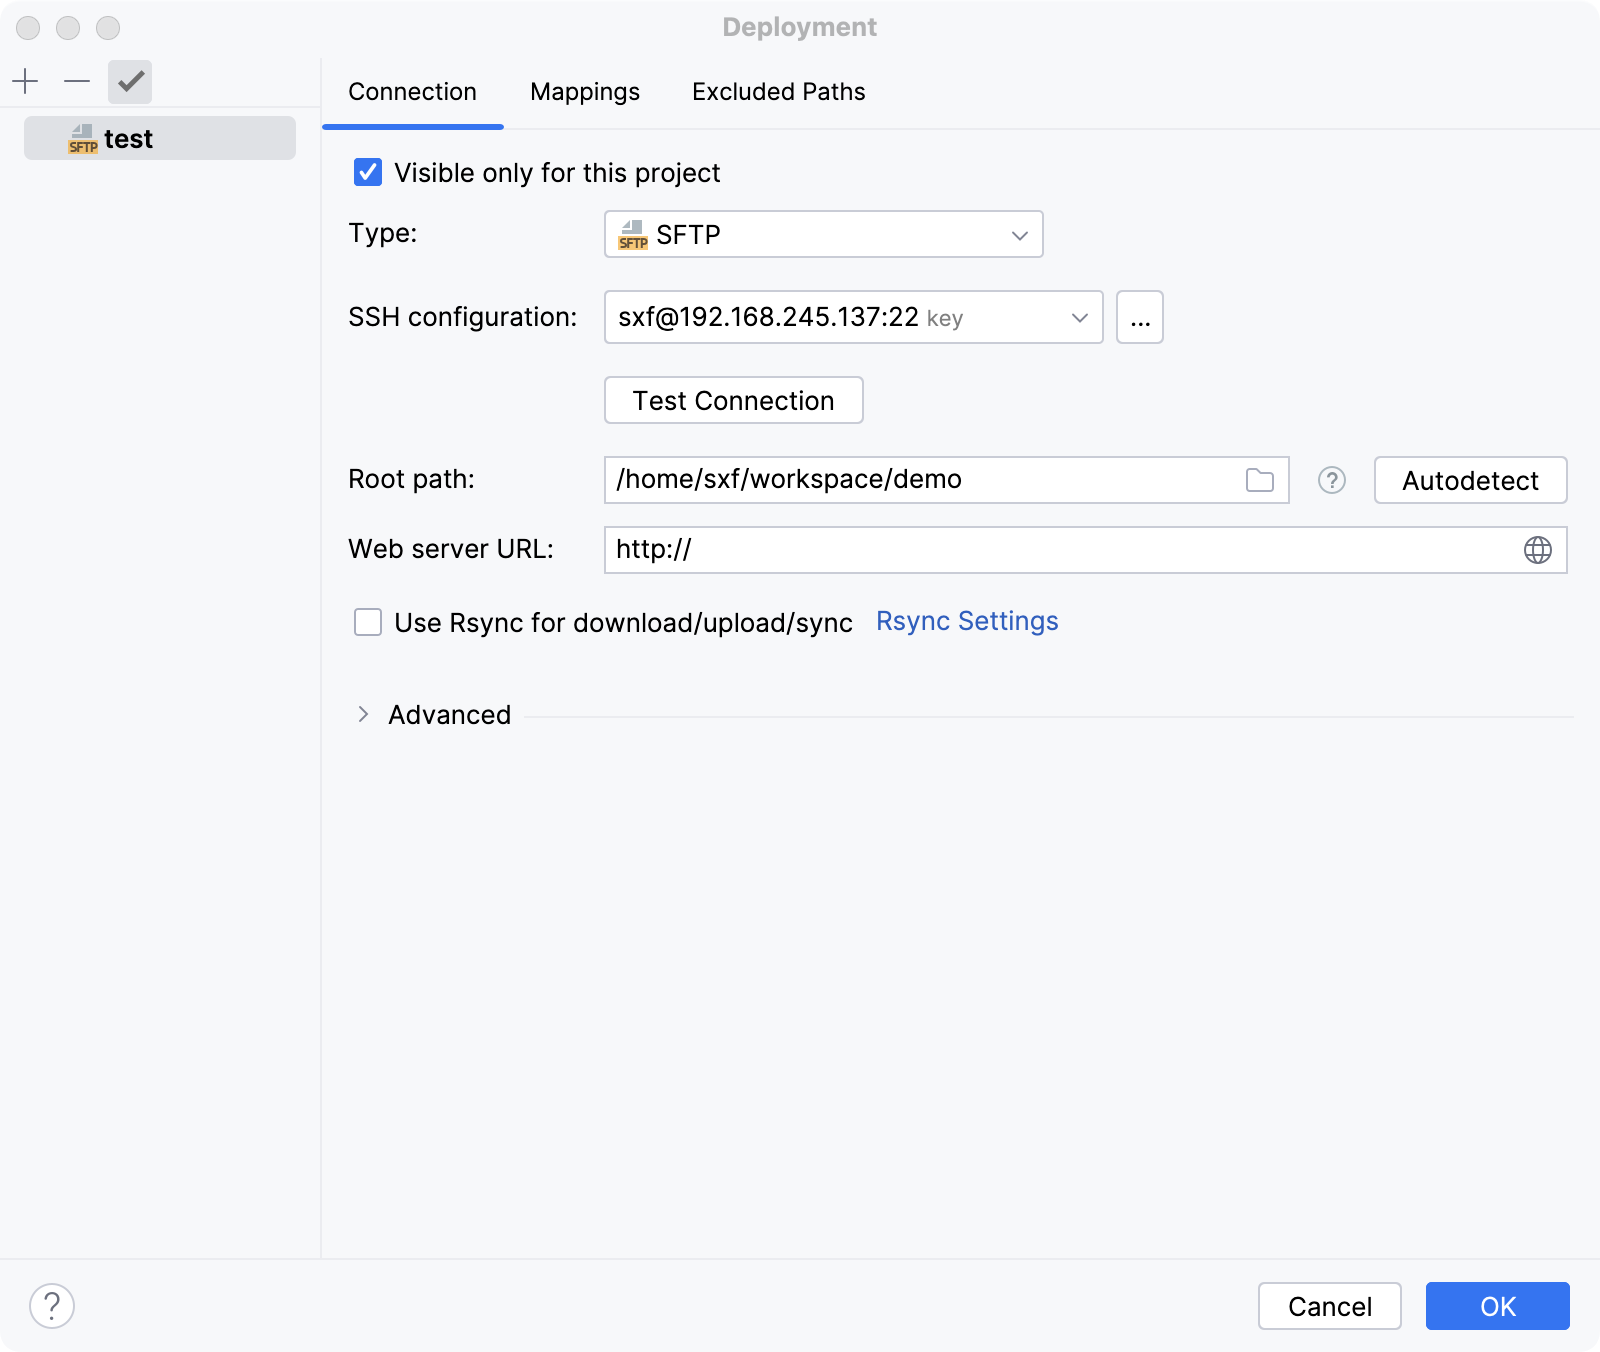
找到 Goland的菜单 Tools -> Deployment -> Configuration ,弹出对话框
这里选择 SFTP,设置一下 ssh 配置,可以使用Test Connection 测试是否连接成功。这里192.168.245.137 是远程调试服务器。
RootPath 是远程服务器项目根目录,这里直接填写项目目录,对于 Web server URL 不用理会。
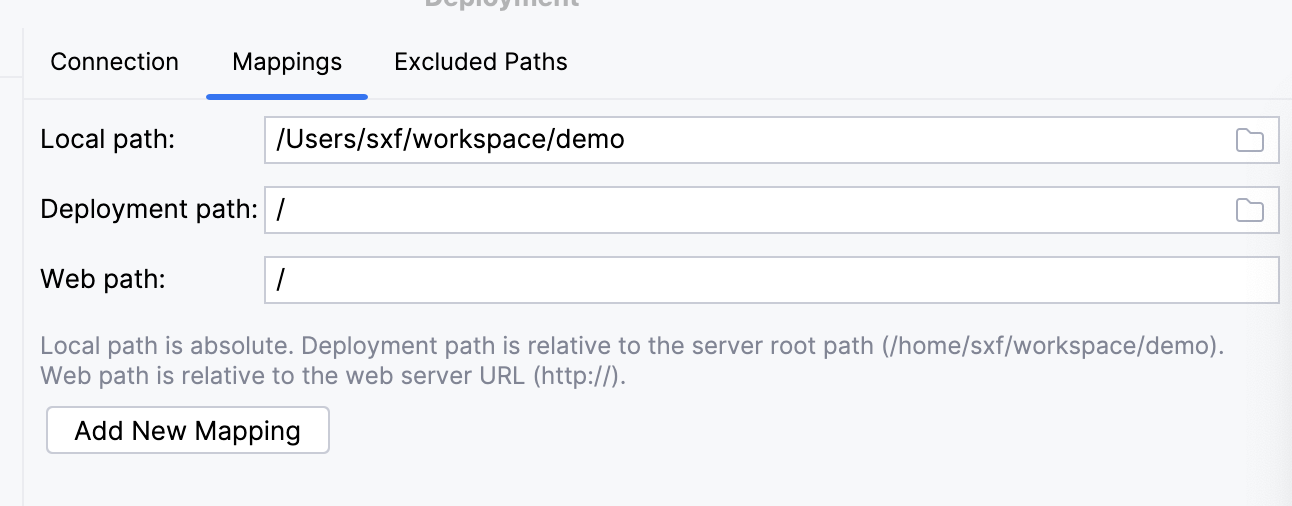
拉着我们设置一下 本地目录与远程调试服务器的映射关系
Local path 开发机器的项目目录
Deployment path 是远程调试服务器的目录,这里是相对上面设置过的Root path来说的。
Web path 不用理会
这里如果设置 Root path 目录为
/home/sxf, 然后再设置Deployment path为/workspace/demo的话,发现一直无法自动同步,不知道是否哪里设置有问题。
现在我们设置好了映射关系 ,测试一下它的同步
点击GoLand 菜单 Toosl -> Deployment -> Browser Remote Host , 则在右侧将出现远程服务器项目目录内容。如果没有显示的话,则右键点击远程服务器的目录,选择菜单 Upload here同步一下即可看到同步后的内容。
为了方便,我们设置一下代码自动同步功能,选中 GoLand 菜单 Tools -> Deployment -> Automatic Uploads(Always)即可。
如果远程文件处于打开状态的话,可能无法立即看到变更的内容,这时刷新一下文件即可
现在我们设置好了代码同步功能,接着在调试服务器编译程序。
编译并启动服务(远程)
在远程调试服务器编译程序,此时要禁用内联和优化(必须禁用优化)
go build -gcflags "all=-N -l" -o app github.com/app/demo
此时生成一个 app 二进制可执行文件。
运行服务
./app --name=zhangsir --sex=1
此时确认一下程序是否可以正常运行。
接着我们使用 dlv 命令对程序启用 debug 模式,这里有两种方法:
一种方法直接对原有的服务进程进行侵入,首先找出来原来 app 进程的PID, 然后执行以下命令
dlv attach PID --headless --api-version=2 --log --listen=:2345
另一种方法是在服务启动时时候,使用指定 dlv 命令启动
dlv --headless --api-version=2 --log --listen=:2345 exec ./app -- --name=zhangsir --sex=1
对于原来的命令与参数之间需要使用 -- 分隔开。
与 dlv debug区别就是 dlv debug 编译一个临时可执行文件,然后启动调试,类似与go run。
也可以给dlv 添加参数
--accept-multiclient表示允许多个客户端连接
这里我使用第二种方法
$ dlv --headless --api-version=2 --log --listen=:2345 exec ./app -- --name=zhangsir --sex=1

API server listening at: [::]:2345
2023-07-27T11:43:22Z warning layer=rpc Listening for remote connections (connections are not authenticated nor encrypted)
2023-07-27T11:43:22Z info layer=debugger launching process with args: [./app --name=zhangsir --sex=1]
2023-07-27T11:43:22Z debug layer=debugger Adding target 24780 "/home/sxf/workspace/demo/app --name=zhangsir --sex=1"
可以看到dlv服务监听在 :2345地址。这里对目标进程(PID=24780) 启用了debug模式,可以通过命令查看一下
$ ps aux | grep app | grep -v grep
sxf        24774  0.0  0.4 5437024 19104 pts/1   Sl   11:43   0:00 dlv --headless --api-version=2 --log --listen=:2345 exec ./app -- --name=zhangsir --sex=1

sxf        24780  0.0  0.0   1608     8 pts/1    t+   11:43   0:00 /home/sxf/workspace/demo/app --name=zhangsir --sex=1
注意这时一共有两个进程, 我们看一下进程之间的关系
$ pstree -p 24774
dlv(24774)─┬─app(24780)
           ├─{dlv}(24775)
           ├─{dlv}(24776)
           ├─{dlv}(24777)
           ├─{dlv}(24778)
           ├─{dlv}(24779)
           ├─{dlv}(24781)
           └─{dlv}(24782)
可以看到两个进程的父子关系。
到此为止,我们在远程调试服务器成功启动了dlv 服务,监听地址为 :2345, 下面我们将用到这些信息。
代码调试(本地)
现在我们在本地设置一下 GoLand 的远程调试功能。
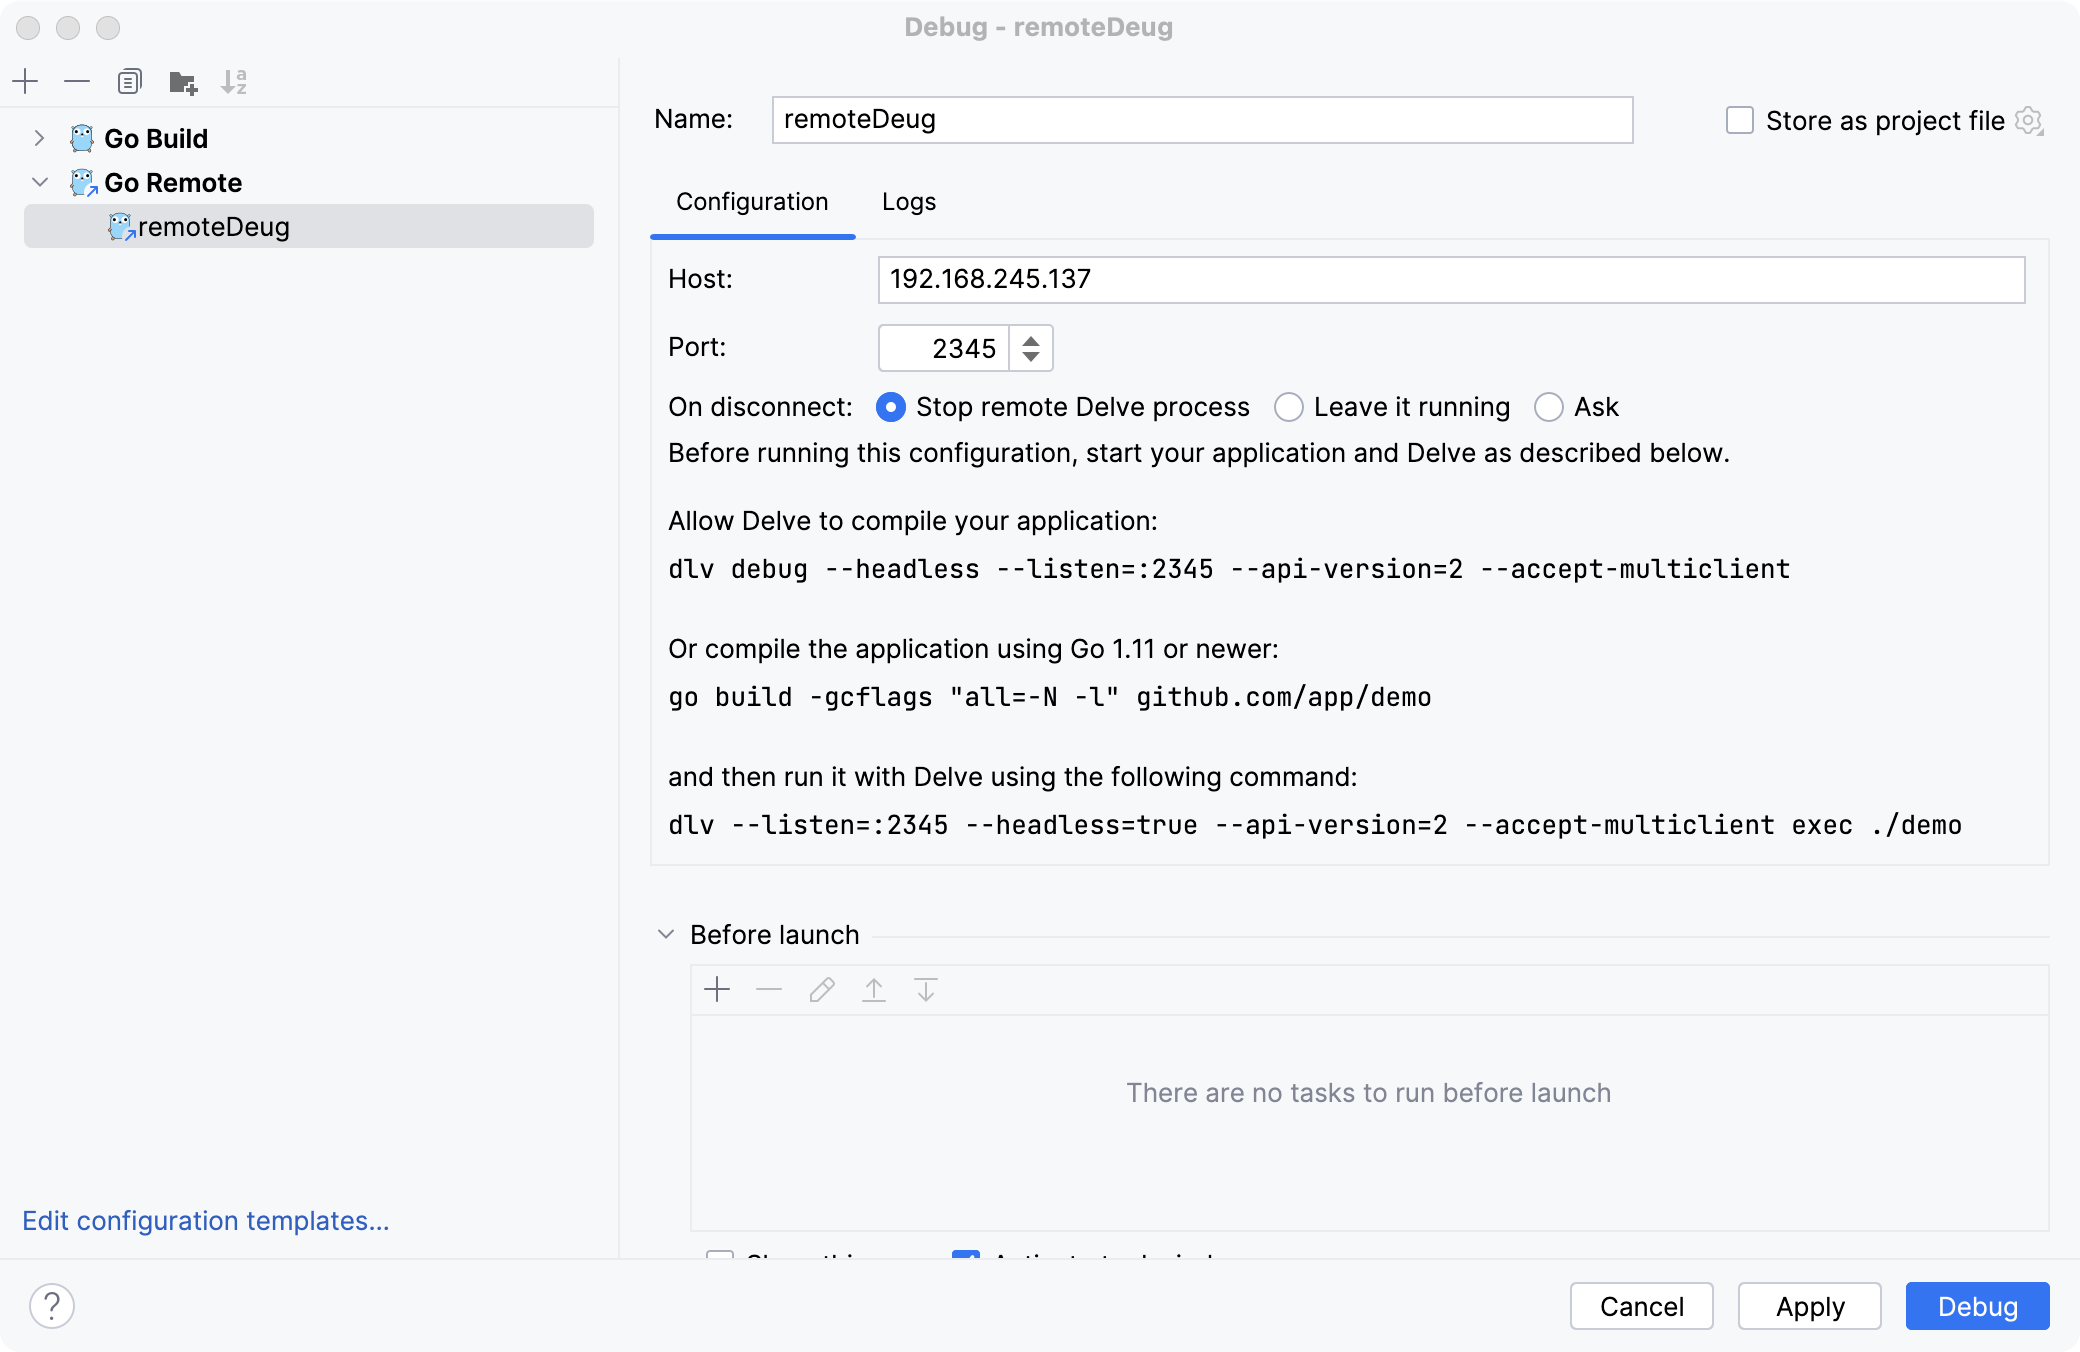
首先打开本地项目文件,添加一些调试断点,然后点击 GoLand 菜单Run -> Debug-> Edit Configuration ,将上面 dlv 远程调试监听地址填写在下面
上面给出了三种服务端运行方式,同时还给出了一个
–accept-multiclient参数,我们这里暂时没有使用。
点击 Debug ,此时可以看到程序执行到了第一个断点。
这时我们在远程调试服务器可以看到 dlv 的输出日志
$ dlv --headless --api-version=2 --log --listen=:2345 exec ./app -- --name=zhangsir --sex=1
API server listening at: [::]:2345
2023-07-27T12:24:28Z warning layer=rpc Listening for remote connections (connections are not authenticated nor encrypted)
2023-07-27T12:24:28Z info layer=debugger launching process with args: [./app --name=zhangsir --sex=1]
2023-07-27T12:24:28Z debug layer=debugger Adding target 25701 "/home/sxf/workspace/demo/app --name=zhangsir --sex=1"

// 以下为首次启动服务时的输出日志
2023-07-27T12:24:35Z info layer=debugger created breakpoint: &api.Breakpoint{ID:1, Name:"", Addr:0x49caa5, Addrs:[]uint64{0x49caa5}, AddrPid:[]int{25701}, File:"/home/sxf/workspace/demo/main.go", Line:23, FunctionName:"main.main", Cond:"", HitCond:"", HitCondPerG:false, Tracepoint:false, TraceReturn:false, Goroutine:false, Stacktrace:0, Variables:[]string(nil), LoadArgs:(*api.LoadConfig)(nil), LoadLocals:(*api.LoadConfig)(nil), WatchExpr:"", WatchType:0x0, VerboseDescr:[]string(nil), HitCount:map[string]uint64{}, TotalHitCount:0x0, Disabled:false, UserData:interface {}(nil)}
2023-07-27T12:24:35Z info layer=debugger created breakpoint: &api.Breakpoint{ID:2, Name:"", Addr:0x49c8f2, Addrs:[]uint64{0x49c8f2}, AddrPid:[]int{25701}, File:"/home/sxf/workspace/demo/main.go", Line:16, FunctionName:"main.main", Cond:"", HitCond:"", HitCondPerG:false, Tracepoint:false, TraceReturn:false, Goroutine:false, Stacktrace:0, Variables:[]string(nil), LoadArgs:(*api.LoadConfig)(nil), LoadLocals:(*api.LoadConfig)(nil), WatchExpr:"", WatchType:0x0, VerboseDescr:[]string(nil), HitCount:map[string]uint64{}, TotalHitCount:0x0, Disabled:false, UserData:interface {}(nil)}
2023-07-27T12:24:35Z info layer=debugger created breakpoint: &api.Breakpoint{ID:3, Name:"", Addr:0x49c970, Addrs:[]uint64{0x49c970}, AddrPid:[]int{25701}, File:"/home/sxf/workspace/demo/main.go", Line:18, FunctionName:"main.main", Cond:"", HitCond:"", HitCondPerG:false, Tracepoint:false, TraceReturn:false, Goroutine:false, Stacktrace:0, Variables:[]string(nil), LoadArgs:(*api.LoadConfig)(nil), LoadLocals:(*api.LoadConfig)(nil), WatchExpr:"", WatchType:0x0, VerboseDescr:[]string(nil), HitCount:map[string]uint64{}, TotalHitCount:0x0, Disabled:false, UserData:interface {}(nil)}
2023-07-27T12:24:35Z debug layer=debugger continuing
接着我们在GoLand点击"Step Over" 继续下一个断点,这时再看一下远程服务器日志
2023-07-27T12:27:57Z debug layer=debugger nexting
可以看到执行了 nexting 命令,表示执行了一个断点。如果程序里有标准输出的话,也可以在日志里看到输出内容。
当程序结束时,远程服务器 dlv 服务也将同时结束。
可以看到这种方式,如果本机每次修改代码后,还需要在远程服务器上重新编译,并启动 dlv 命令,还是有些麻烦的。
参考资料
- https://github.com/go-delve/delve/blob/master/Documentation/usage/dlv.md
- https://zhuanlan.zhihu.com/p/639888116