如何构建千万用户级别后台数据库架构设计的思路
【 导读】
关于如何构建千万级别用户的后台数据库架构话题,在ITPUB及CSDN论坛都有不少网友提问,新型问答网站知乎上也有人提问,并且顺带梳理了下思路,方便更多的技术朋友有章可循,整理一篇抛砖引玉性的文章。
一、 技术朋友给出的背景资料:
(1). 网站型应用,主要指:SNS社交网站、新闻门户型网站、邮件系统、SNS Game社交游戏、电子商务网站、即时通信IM等类型系统;
(2). 注册用户为千万级别,也即1KW注册用户以内;
二、要求
构建千万级别用户的后台数据库架构分析思路,对数据层架构设计的有章可循,必须考虑数据量的大小,以及数据库提供服务的性能和系统的可靠性,适当地考虑用户量超过,以及需要使用的服务器资源等信息。
三、构建千万级别用户的后台数据库架构的分析思路
曾经发过一篇文章,关于千万级别用户应用架构设计的歌谣,供大家参考 千万级架构设计诀窍,接下来我们针对如何构建千万级别用户的后台数据库架构,给出通用性分析思路的建议,未必完全靠谱,但求基本靠谱(注:毕竟很多事情需要看具体业务而定的):
(1). 一定要区分业务类型,可能达到千万用户级别的应用业务场景,可归类描述为: SNS社交平台、SNS社交游戏、即时通信IM系统、电子商务、邮件系统、新闻门户网站等,这些不同类型的业务场景做法会不一样,主要是由他们业务性质决定,后续分析项中逐一描述;
(2). 应用业务的核心KPI数值,产品每天的日活跃用户量大概多少?若是网站类型应用,还需要加入其他参数PV,UV等数据辅助决策,即时通信IM的消息量,邮件系统的新增邮件数,SNS社交平台的Feeds量等核心数据;
(3). 系统中每个用户可能产生的数据量大概多大,分固定部分,以及动态部分的方式统计分析,对非固定部分以参考值和结合实践跨度(注释:1年为硬性指标,2年为预期,3年可选,再长的时间段不考虑)的方式进行分析,然后预测出整个系统的用户锁产生的数据条数和数据容量大概的估值;
(4). 注册用户并不等于活跃用户,为此需要预估日活跃用户量大概多少?周活跃用户量大概?月活跃用户量大概多少?系统设计的最高并发量为多少?这数字还是非常有必要,不管是对数据量预估,还是对技术实现方案的选择都有帮助;
(5). 根据应用业务的特点,以及系统不同模块的功能特点,初期必须判断出可能负载最大的系统模块,对于可以静态化模块或功能,尽量要Cache起来,以降低系统的负载和提高前端响应速度;若是非Cache技术能解决的,是否可以考虑独立或通过整体水平扩展方式解决系统的负载和性能问题;
(6). 针对系统中各个模块的功能或业务特点,大致那些用户数据会累计比较大,以及那些数据操作频率比较高;
(7). 不同的业务其对数据操纵不一样,要大致明白自己的应用:读写比如关系,也即:SELECT:UPDATE:DELETE:UPDATE=?;
(8). 系统的整体架构中,必须考虑系统的稳定性、负载均衡和响应速度,为此必须考虑一些模块借助Cache、异步、消息队列等技术,进行一些特殊处理或折中做法,以达到目标;
(9). 若使用MySQL数据库产品作为后台数据库提供数据服务,建议尽量使简洁的SQL语句,并不是说不用JOIN,而是要考虑MySQL对JOIN的实现算法,符合Nested loop join优缺点中的优点;
(10). 数据库结构设计
既然说是 构建千万级别用户的后台数据库架构,前面讲清楚如何熟悉和理解业务模型,清楚系统可能存在的瓶颈、技术难度,以及一些技术实现方案,现在必须回归到数据库设计阶段。
开始讨论如何收集、分析和设计数据库结构之前,我们先简单地对数据库,什么情况下要考虑进行水平拆分?尤其针对互联网行业流行的数据库产品MySQL来讨论,各大数据库技术论坛或个人博客型技术网站,有不少名言式的基调:数据量超过100W,就需要分表,MySQL无法支持大数据量的服务等等?
以前的MySQL(主要指:MySQL5.0以前版本)版本确实存在诸多问题,以及当时跑MySQL的服务器一般都是超低配置,还依然记得当时我们的数据库服务器最高也就8G内存,一般都是2G内存,硬盘都是单盘且转速是10K,甚至7500转的,而当时大多主流数据库产品Oracle跑的服务器配置却很少这么差。我们大家要一时俱进,技术人员尤其DBA或架构师,要学会以数据说话,以其中一测试用例,DELL 2950 415K146G RAID1+0 ,16G内存,E5410 CPU*2 ,一张分31个分区的区表业务模型只有INSERT+SELECT,且以50个INSERT+10个SELECT线程并发执行, 总记录写入数据量 6KW 行左右,单表数据容量超过100G ,并发从最高的9100 TPS/S 下降到8700 TPS/S 之后就稳定在此值。
上面论述MySQL支持大表并没有太大的性能方面的下降,但是并不表示笔者建议大家这么做,至少有二点MySQL的备份和数据库结构变更非常麻烦,尤其数据库结构变更其特殊的做法,使其成为一大瓶颈,也不知道要牺牲我们多少DBA的睡眠,具体的信息大家可以参考文章 MySQL数据库生产环境维护,但是对于新闻内容的存储需求,可以把新闻主题内容单独放到一张表中,以子表的方式存在,提供数据服务器,且该数据很少做变更,一般情况下是INSERT之后就只有读为主,那么就不会是任何问题,阿里巴巴旺旺弹出的新闻页面的内容就是采用此方式存储,当时单表容量接近1T,早高峰的时候也不会出现服务器性能问题,以及系统负载都非常稳定。
我们继续回到 构建千万级别用户的后台数据库架构 的话题上,具体建议或做法如下所示:
10.1> 数据库的设计开始之前,必须优先进行业务的数据流梳理(注释:必须尽量考虑应用所有可能的功能模块),以及对业务优先进行优化和规划,然后根据数据流和功能 考虑数据库的结构设计和优化;
10.2> 千万级别用户量,若是非游戏行业的产品(SNS游戏除外),建议考虑用户数据拆分架构设计,以及考虑后续未来1-2年的承受量,若是SNS平台必须考虑拆分,除非考虑上SSD、Fusion-io、存储等更高端的设备,用金钱换时间的方式支持技术改造;
10.3> 数据拆分的核心与难处:同一个用户的数据尽量放一起(拆分规则要尽量简单可执行),拆分之后用户关系的数据如何保存的抉择有多种(存2份或存1份放一个地方),难处数据的分页,统计合并等;
10.4> 要考虑一些冗余的方式解决SQL性能问题,但是又不能过多引入冗余而造成IO开销增加太多,冗余字段要尽量整型字段;
10.5> 数据库表对象的字段属性,要尽量考虑数字化,尤其游戏行业;
By admin
read more图解”How MySQL Replication Works”
在使用MySQL的应用中,如果你的MySQL Server压力逐渐增大,在应用层优化已经到了一定瓶颈时,那么你应该首先考虑 MySQL_Replication。本文将利用图示的方式简单的描述出MySQL Replication是如何工作的。
如何同步
- 主库将所有的更新操作,写入二进制日志。
- 从库运行”IO线程”(Slave IO Thread)读取主库的二进制日志。
- 从库运行”SQL线程”(Slave SQL Thread)执行IO线程(Slave IO Thread)读取的日志中的SQL,从而保持和主库的一致。
如何分配请求
- 目前,这部分需要在应用层实现。
- 执行更新SQL(UPDATE,INSERT,DELETE)时,请求主库。
- 执行查询SQL(SELECT)时,请求从库。
所以,当你的应用(Application)SELECT请求所占的比率越大,那么Relication就会越有效。
相关教程:
MySQL传输二进制日志原理:
By admin
read moreMySQL传输二进制日志原理
摘自:
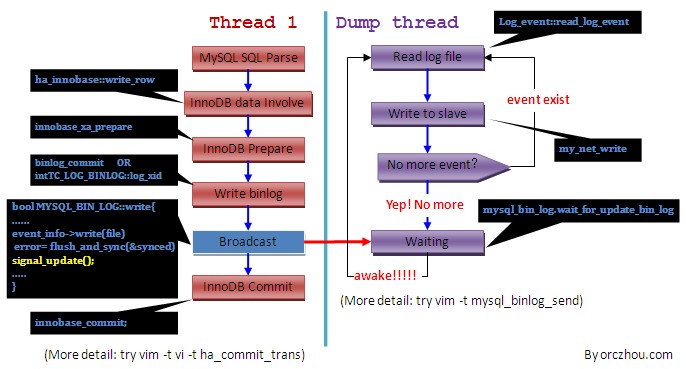
MySQL Replication可以很方便的用来做应用的读扩展,也可以帮MySQL实现一定程度的HA方案。MySQL通过向备库传送二进制日志来实现Replication,本文将通过二进制日志相关源代码的主要接口来解释:“MySQL如何传输二进制日志,是主库推,还是备库拉?MySQL日志传输的实时性如何?”。
在MySQL Replication结构中,备库端初次通过CHANGE MASTER TO完成Replication配置,再使用start slave命令开始复制。更细致的,备库通过IO Thread向主库发起读取binlog的请求(COM_BINLOG_DUMP命令),主库收到COM_BINLOG_DUMP请求后,使用单独线程(dump thread)不断向备库IO Thread发送Binlog。示意图:
在主库端一旦有新的日志产生后,立刻会发送一次广播,dump线程在收到广播后,则会读取二进制日志并通过网络向备库传输日志,所以这是一个主库向备库不断推送的过程;
新日志在产生后,只需一次广播和网络就会立刻(<1ms)向发送到备库,如果主备之间网络较好的话(例如RTT<1ms),备库端的日志也就小于2ms了。所以,一般的(依赖于RTT),备库的实时性都非常好。
参考:
By admin
read morevarnish中vcl_recv子程序actions 动作
主要有以下动作 pass \当一个请求被pass后,这个请求将通过varnish转发到后端服务器,但是它不会被缓存。pass可以放在vcl_recv 和 vcl_fetch中。 lookup \当一个请求在vcl_recv中被lookup后,varnish将从缓存中提取数据,如果缓存中没有数据,将被设置为pass,不能在 vcl_fetch中设置lookup。 pipe \pipe和 pass相似,都要访问后端服务器,不过当进入pipe 模式后,在此连接未关闭前,后续的所有请求都发到后端服务器(这句是我自己理解后简化的,有能力的朋友可以看看官方文档,给我提修改建议) 。 deliver \请求的目标被缓存,然后发送给客户端 esi \ESI-process the fetched document(我理解的就是vcl 中包换一段 html代码)
By admin
read morevarnishstat 参数分析
Hitrate ratio由三个数字组成,第一个数字范围0-10,第二个数字范围0-100,第三个数字范围0-1000。
分别表示过去N秒内的Hitrate avg。上图由于我是刚打开varnishstat,因此三个数字都是4,表示过去4秒内的平均hitrate,如果打开的时间足够长,以上三个数字就会逐渐变成10,100,1000。
Hitrate avg里的内容是命中率,需要乘以100转换成百分比,例如上图表示命中率为99.23%
接着往下看,三列数据分别表示实时数据,每秒平均值,自启动以来每秒平均值。有些参数是没有后两列的,这是因为这些值都有固定变动范围,例如N work threads,只会在0到最大值(我设的是200)之间变动,搞每秒平均值意义不大(我猜)。
以下指标需要重点关注一下:
Client connections accepted: (每秒处理连接数)。 Client requests received:经验表明connection:request=1:10左右时比较理想,比这个数大很多或者小很多都是不好的。代表到目前为止,浏览器向反向代理服务器发送的HTTP请求累积次数,由于可能使用长连接,所以它可能会大于上边的Client connections accepted。 Backend connections failures:这个数应该尽可能小,没有就最好,多的话就要看看backend指向的服务是否有问题了。 N struct object:当前被cache的条目。 N worker threads:当前工作线程数。 N worker threads created:创建了多少线程(should be close to the number you are running now) 。 N worker threads not created :最好是0,表示varnish尝试创建线程但失败。 N worker threads limited :由于线程上限限制或者线程池反应延迟导致不能成功创建的线程数,越小越好。 N overflowed work requests :进入等待队列的请求数,越小越好。 N dropped work requests:队列被塞满后扔掉的请求,这个最好不要有。 N LRU nuked objects:由于cache空间满而不得不扔掉的cache条目,如果这个数字是0,就没必要增加cache的大小了。 n_expired :由于cache时间超时而被扔掉的cache条目,具体要看你的ttl设多大了。 Cache hits: 代表在这些请求中,反向代理服务器在缓存区中查找并且命中缓存的次数。 Cache misses: 代表在这些请求中,反向代理服务器在缓存区中查找但是没有命中缓存的次数。 N expired objects: 代表过期的缓存内容个数 N LRU nuked objects: 由于cache空间满而不得不扔掉的cache条目,如果这个数字是0,就没必要增加ache的大小了。 N LRU moved objects: 代表被淘汰的缓存内容个数 Total header bytes: 代表缓存区中所有缓存内容的HTTP头信息长度 Total body bytes: 代表缓存区中所有缓存内容的正文长度
By admin
read morevarnishncsa(以 NCSA 的格式显示日志)
●varnishncsa(以 NCSA 的格式显示日志)
Author: Dag-Erling Sm?rgrav
Date: 2010-05-31
Version: 1.0
Manual section: 1
Display varnish logs in apache/NCSA combined log format
SYNOPSIS
varnishncsa [-a] [-b] [-C] [-c] [-D] [-d] [-f] [-I regex] [-i tag]
[-n varnish_name] [-P file] [-r file] [-V] [-w file] [-X regex] [-x tag]
DESCRIPTION
Varnishncsa 工具读取共享内存的日志,然后以 apache/NCSA 的格式显示出来。下 面的选项可以用。
-a 当把日志写到文件里时,使用附加,而不是覆盖。
-b 只显示 varnishd 和后端服务器的日志。
-C 匹配正则表达式的时候,忽略大小写差异。
-c 只显示 varnishd 和客户端的日志。
-D 以进程方式运行
-d 在启动过程中处理旧的日志,一般情况下,varnishhist 只会在进程写入日 志后启动。
By admin
read moreMisbehaving servers(服务器停止运转)
Varnish的一个关键特色就是它有能力防御 web和应用服务器宕机。 Grace mode 当几个客户端请求同一个页面的时候,varnish只发送一个请求到后端服务器,然后让那个其他几个请求挂起等待返回结果,返回结果后,复制请求的结果发送给客户端。 如果您的服务每秒有数千万的点击率,那么这个队列是庞大的,没有用户喜欢等待服务器响应。为了使用过期的 cache 给用户提供服务,我们需要增加他们的 TTL,保存所有cache 中的内容在 TTL过期以后30 分钟内不删除,使用以下VCL:
sub vcl_fetch {
   set beresp.grace = 30m;
}
Varnish 还不会使用过期的目标给用户提供服务,所以我们需要配置以下代码,在cache过期后的15 秒内,使用旧的内容提供服务:
sub vcl_recv {
   set req.grace = 15s;
}
你会考虑为什么要多保存过去的内容 30 分钟?当然,如果你使用了健康检查,你可以通过健康状态设置保存的时间:
if (! req.backend.healthy) {
    set req.grace = 5m;
} else {
    set req.grace = 15s;
}
Saint mode 有时候,服务器很古怪,他们发出随机错误,您需要通知 varnish 使用更加优雅的方式处理它,这种方式叫神圣模式(saint mode)。Saint mode允许您抛弃一个后端服务器或 者另一个尝试的后端服务器或者 cache中服务陈旧的内容。让我们看看 VCL中如何开启这个功能的:
sub vcl_fetch {
   if (beresp.status == 500) {
     set beresp.saintmode = 10s;
     restart;
   }
   set beresp.grace = 5m;
}
当我们设置 beresp.saintmode 为 10 秒,varnish 在 10 秒内将不会访问后端服务器的这个 url。如果有一个备用列表,当重新执行此请求时您有其他的后端有能力提供此服务内容,varnish会尝试请求他们,当您没有可用的后端服务器,varnish将使用它过期的 cache提供服务内容。 它真的是一个救生员。 God mode 还未应用。
By admin
read morevarnish中的Health checks(健康检查)
让我们设置一个 director和两个后端,然后加上健康检查:
backend server1 {
   .host = "server1.example.com";
   .probe = {
          .url = "/";
           .interval = 5s;
          .timeout = 1 s;
          .window = 5;
          .threshold = 3;
     }
   }
backend server2 {
    .host = "server2.example.com";
    .probe = {
          .url = "/";
          .interval = 5s;
          .timeout = 1 s;
          .window = 5;
          .threshold = 3;
    }
  }
这些新的就是探针,varnish将检查通过探针检查每个后端服务器是否健康:
url \哪个 url需要varnish请求。 Interval \检查的间隔时间 Timeout \等待多长时间探针超时 Window \varnish将维持5个 sliding window的结果 Threshold \至少有3 次.windows检查是成功的,就宣告 backends健康
By admin
read morevarnish中的Directors
您可以把多台 backends 聚合成一个组,这些组被叫做 directors。这样可以增强性能和弹力。您可以定义多个 backends和多个 group在同一个directors。
backend server1 {
     .host = "192.168.0.10";
}
backend server2{
     .host = "192.168.0.10";
}
现在我们创建一个 director:
director example_director round-robin {
{
         .backend = server1;
}
# server2
{
         .backend = server2;
}
# foo
}
这个 director 是一个循环的 director。它的含义就是 director 使用循环的方式把backends分给请求。 但是如果您的一个服务器宕了?varnish 能否指导所有的请求到健康的后端?当然可以,这就是健康检查在起作用了。
By admin
read morevarnish中advanced backend configuration (后端服务高级配置)
在某些时刻您需要 varnish 从多台服务器上缓存数据。您可能想要 varnish 映射所有的URL 到一个单独的主机或者不到这个主机。这里很多选项。 我们需要引进一个 java程序进出php的web站点。假如我们的java程序使用的 URL开始于/JAVA/
我们让它运行在8000端口,现在让我们看看默认的default.vcl:
backend default {
     .host = "127.0.0.1";
     .port = "8080";
}
我们添加一个新的 backend:
backend java {
     .host = "127.0.0.1";
     .port = "8000";
}
现在我们需要告诉特殊的URL 被发送到哪里:
sub vcl_recv {
     if (req.url ~ "^/java/") {
         set req.backend = java;
     } else {
         set req.backend = default.
     }
}
这真的很简单,让我们停下来并思考一下。正如您所见,可以通过任意的后端来选择您要的数据。您想发送移动设备的请求到不同的后端?没问题
if (req.User-agent ~ /mobile/) …. \这样做应该就可以成功。
By admin
read moreAchiveving a high hitrate(提高缓存命中率)-varnish篇
现在 varnish 已经正常运行了,您可以通过 varnish 访问到您的 web 应用程序。如果您的 web 程序在设计时候没有考虑到加速器的架构,那么您可能有必要修改您的应用程序或者varnish配置文件,来提高varnish的命中率。 既然这样,您就需要一个工具用来观察您和web服务器之间HTTP头信息。服务器端您可以轻松的使用varnish 的工具,比如varnishlog和 varnishtop,但是客户端的工具需要您自己去准备,下面是我经常使用的工具。 Varnistop 您可以使用varnishtop 确定哪些URL经常命中后端。 Varnishtop –i txurl 就是一个基本的命令。您可以通过阅读“Statistics”了解其他示例。
Varnishlog 当您需要鉴定哪个 URL 被频繁的发送到后端服务器,您可以通过varnishlog对请求做一个全面的分析。 varnishlog –c –o /foo/bar 这个命令将告诉您所有(-o)包含”/football/bar”字段来自客户端(-c)的请求。
Lwp-request Lwp-request是 www 库的一部分,使用perl语言编写。它是一个真正的基本程序,它可以执行HTTP请求,并给您返回结果。我主要使用两个程序,GET 和HEAD。 Vg.no 是第一个使用 varnish 的站点,他们使用 varnish 相当完整,所以我们来看看他们的HTTP 头文件。我们使用 GET请求他们的主页:
$ GET -H 'Host: www.vg.no' -Used http://vg.no/
GET http://vg.no/
Host: www.vg.no
User-Agent: lwp-request/5.834 libwww-perl/5.834

200 OK
Cache-Control: must-revalidate
Refresh: 600
Title: VG Nett - Forsiden - VG Nett
X-Age: 463
X-Cache: HIT
X-Rick-Would-Never: Let you down
X-VG-Jobb:  http://www.finn.no/finn/job/fulltime/result?keyword=vg+multimedia
Merk:HeaderNinja
X-VG-Korken: http://www.youtube.com/watch?v=Fcj8CnD5188
X-VG-WebCache: joanie
X-VG-WebServer: leon
OK,我们来分析它做了什么。GET 通过发送 HTTP 0.9 的请求,它没有主机头,所以我需要添加一个主机头使用-H 选项,-U打印请求的头,-s打印返回状态,-e 答应返回状态的头,-d 丢弃当前的连接。我们正真关心的不是连接,而是头文件。 如您所见 VG 的头文件中有相当多的信息,比如 X-RICK-WOULD-NEVER 是 vg.no 定制的信息,他们有几分奇怪的幽默感。其他的内容,比如X-VG-WEBCACHE 是用来调试错误的。 核对一个站点是否使用 cookies,可以使用下面的命令:
By admin
read morevarnish中的Statistics(统计 varnish相关数据)-Varnishtop ,Varnishhist ,Varnishsizes ,Varnishstat
现在您的varnish已经正常运行,我们来看一下varnish在做什么,这里有些工具可以帮助您做到。 Varnishtop Varnishtop工具读取共享内存的日志,然后连续不断的显示和更新大部分普通日志。 适当的过滤使用 –I,-i,-X 和-x 选项,它可以按照您的要求显示请求的内容,客户端,浏览器等其他日志里的信息。
varnishtop -i rxurl \您可以看到客户端请求的 url次数。 Varnishtop -i txurl \您可以看到请求后端服务器的url次数。 Varnishtop -i Rxheader –I Accept-Encoding \可以看见接收到的头信息中有有多少次包含Accept-Encoding。
Varnishhist Varnishhist工具读取varnishd的共享内存段日志,生成一个连续更新的柱状图,显示最后 N 个请求的处理情况。这个 N 的值是终端的纵坐标的高度,横坐标代表的是对数,如果缓存命中就标记“|”,如果缓存没有命中就标记上“#”符号。
Varnishsizes Varnishsizes 和varnishhist相似,除了varnishsizes现实了对象的大小,取消了完成请求的时间。这样可以大概的观察您的服务对象有多大。
Varnishstat Varnish 有很多计数器,我们计数丢失率,命中率,存储信息,创建线程,删除对象等,几乎所有的操作。Varnishstat将存储这些数值,在优化varnish的时候使用这个命令。
有一个程序可以定期轮询 varnishstat 的数据并生成好看的图表。这个项目叫做Munin。 Munin可以在 http://munin-monitoring.org/找到。在varnish的源码中有munin插件。
By admin
read moreVarnish Configuration Language – VCL (varnish 配置 语言-VCL)
官方手册:
** **Varnish 有一个很棒的配置系统,大部分其他的系统使用配置指令,让您打开或者关闭一些开关。 Varnish使用区域配置语言,这种语言叫做“VCL”(varnish configuration language),在执行vcl时,varnish 就把VCL转换成二进制代码。 ** **VCL 文件被分为多个子程序,不同的子程序在不同的时间里执行,比如一个子程序在接到请求时执行,另一个子程序在接收到后端服务器传送的文件时执行。 varnish 将在不同阶段执行它的子程序代码,因为它的代码是一行一行执行的,不存在优先级问题。随时可以调用这个子程序中的功能并且当他执行完成后就退出。
** **如果到最后您也没有调用您的子进程中的功能,varnish 将执行一些内建的 VCL代码,这些代码就是default.vcl 中被注释的代码.
** 99%的几率您需要改变vcl_recv 和 vcl_fetch 这两个子进程。**
vcl_recv ** **vcl_recv(当然,我们在字符集上有点不足,应为它是unix)在请求的开始被调用,在接收、解析后,决定是否响应请求,怎么响应,使用哪个后台服务器。在vcl_recv中,您可以修改请求,比如您可以修改cookies,添加或者删除请求的头信息。 ** **注意vcl_recv中只有请求的目标,req is available。 vcl_fetch ** **vcl_fetch 在一个文件成功从后台获取后被调用,通常他的任务就是改变 response headers,触发ESI进程,在请求失败的时候轮询其他服务器。 在 vcl_fetch 中一样的包含请求的 object,req,available,他们通常是 backend response,beresp。beresp 将会包含后端服务器的HTTP 的头信息
actions ** 主要有以下动作** pass \当一个请求被pass后,这个请求将通过varnish转发到后端服务器,但是它不会被缓存。pass可以放在vcl_recv 和 vcl_fetch中。 lookup \当一个请求在vcl_recv中被lookup后,varnish将从缓存中提取数据,如果缓存中没有数据,将被设置为pass,不能在 vcl_fetch中设置lookup。 pipe \pipe和 pass相似,都要访问后端服务器,不过当进入pipe 模式后,在此连接未关闭前,后续的所有请求都发到后端服务器(这句是我自己理解后简化的,有能力的朋友可以看看官方文档,给我提修改建议) 。 deliver \请求的目标被缓存,然后发送给客户端 esi \ESI-process the fetched document(我理解的就是vcl 中包换一段 html代码)
Requests,Responses and objects 在VCL 中,有3 个重要的数据结构 ** **request 从客户端进来 ** **responses 从后端服务器过来 ** **object 存储在cache 中
By admin
read morePutVarnish on port 80(使varnish工作在 80 端口上)
PutVarnish on port 80(使 varnish工作在 80 端口上) 如果您的程序正常运行,没有问题,我们就可以把varnish调整到80端口运行。先关闭vernish
pkill varnishd
然后停止您的 web服务器,修改web服务器配置,把 web服务器修改成监听8080端口,然后修改varnish 的default.vcl和改变默认的后端服务器端口为8080. 先启动您的web服务器,然后在启动varnish:
varnishd -f /usr/local/etc/varnish/default.vcl -s malloc,1G -T 127.0.0.1:2000
我们取消了-a 选项,这样varnish将监控默认端口,启动后,检查您的 web程序是否正常。
相关教程:
varnish中Varnishlog命令解析:
linux下varnish配置及使用教程:
Varnish Configuration Language – VCL (varnish 配置 语言-VCL):
varnish中的Statistics(统计 varnish相关数据)-Varnishtop ,Varnishhist ,Varnishsizes ,Varnishstat: http://blog.haohtml.com/archives/12036
bankend Server后端服务高级配置:
varnish中的backends 组Directors: http://blog.haohtml.com/archives/12049
varnish中常用的排错方法:
By admin
read more
